Please head to my Instagram page southlake_campercraft for video walk through(s), additional pictures, and a look at some of my other builds!
About The Van
I ordered an AWD Transit in 2021 and like the majority of orders it was not built. When I ordered another AWD Transit in 2022 it was critical that I avoided options known to delay/prevent the build and – for that reason – my van was actually built. The options on this van are minimal but essential in my opinion and include the following:
- 3.5L EcoBoost
- 10 Way Power/Heated (Palazzo Cloth) Seats
- Keyless Entry Pad
- HD Trailer Tow Package
- Cruise Control
- Aux Fuel Port Extension
- Front Overhead Shelf
- Large Center Console
- 2 Additional Keys
About the Build
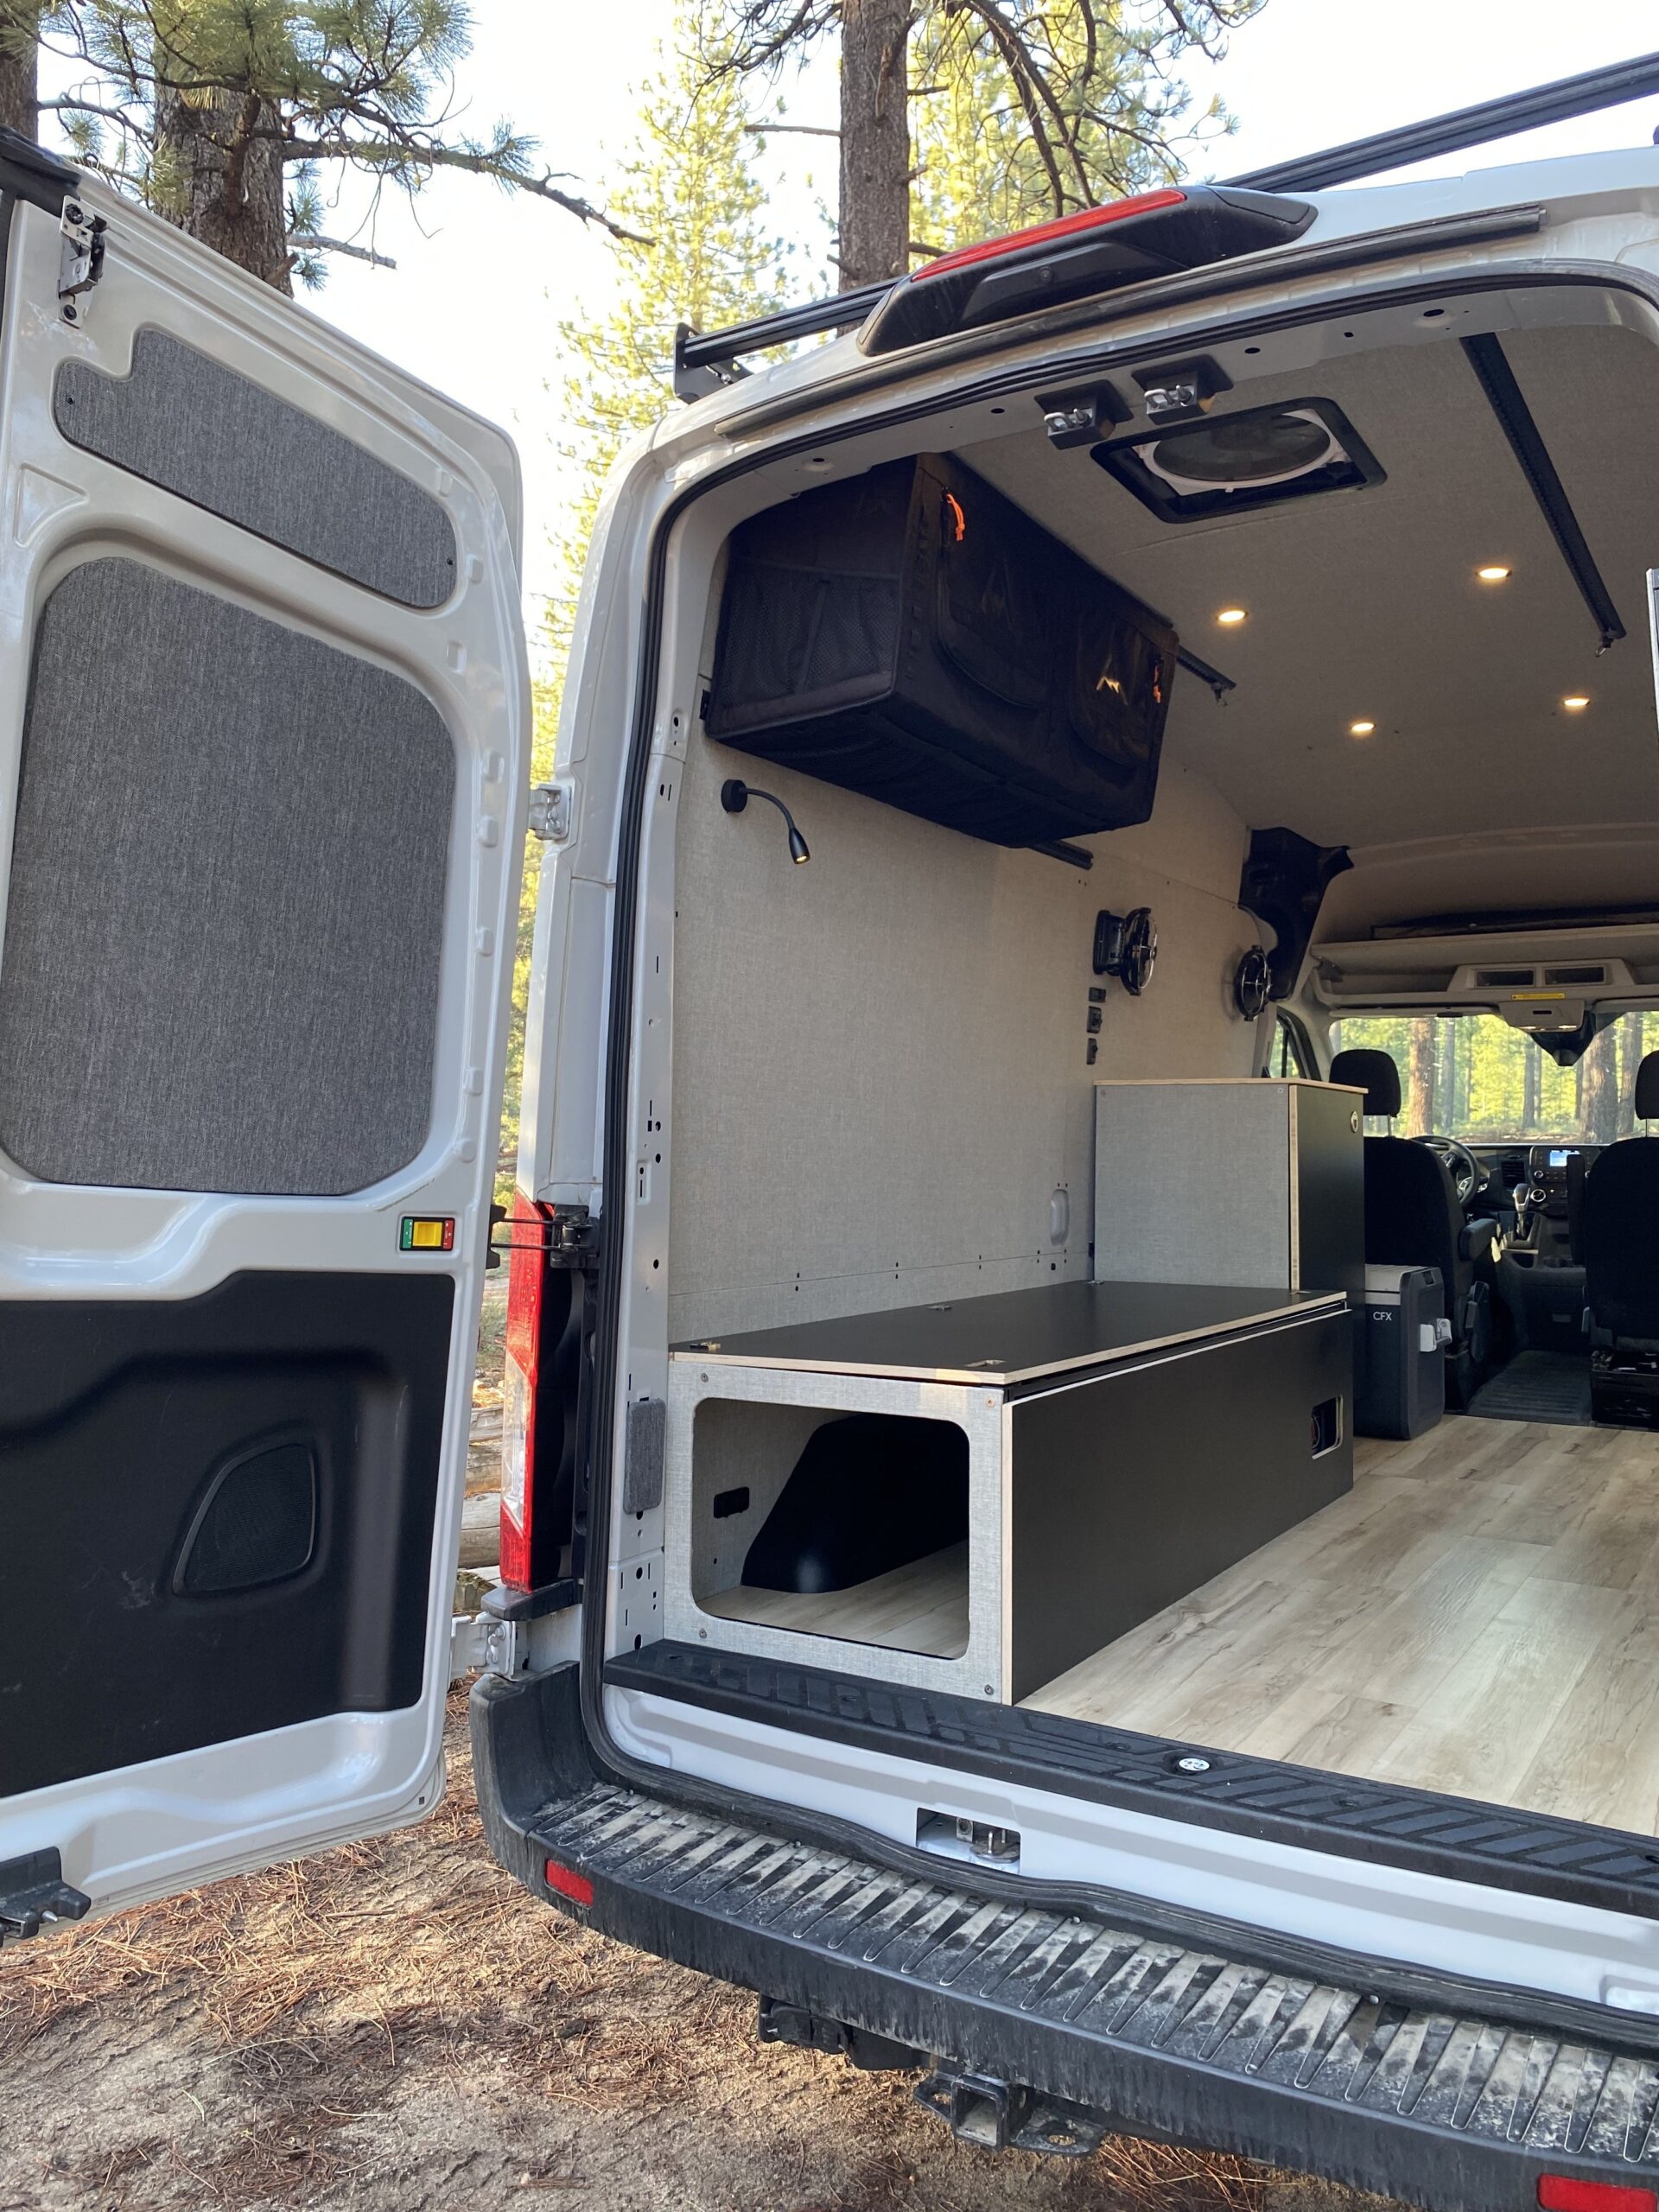
This van isn’t a full time, off grid home on wheels and it’s not pretending to be. It also isn’t a Pinterest build with an emphasis on aesthetics rather than function, durability, and longevity. We built this rig based on everything that we’ve learned over my last seven van builds and 5 years of “van life.” I only used materials that have stood up to our needs in previous builds. If I used it before and it broke or failed, you won’t find it in this build. Our “van life” used to mean full-time living in a van for 2-3 months/year but now our van life is getting from point A to point B comfortably with our gear and dogs and having an amazing time once we get there for a weekend or few weeks. This van makes an amazing base camp for all of our adventures. All of our gear has a dedicated space while we travel. We have an incredible amount of room to get ready/move around the van with the bed against the wall. When the bed is down we’ve got tons of room for ourselves and our two dogs to spread out. Every detail of this build has been carefully thought out and built to last. If it’s a component that may wear out in time it has been built to be easily serviced if needed. We used the lightest and strongest materials available but that doesn’t always mean the least expensive materials available at local big box stores. If you’re asking “why doesn’t this build have a ____” it’s because we tried that and found that it wasn’t a critical component of us having an amazing time traveling and enjoying our time away from home.
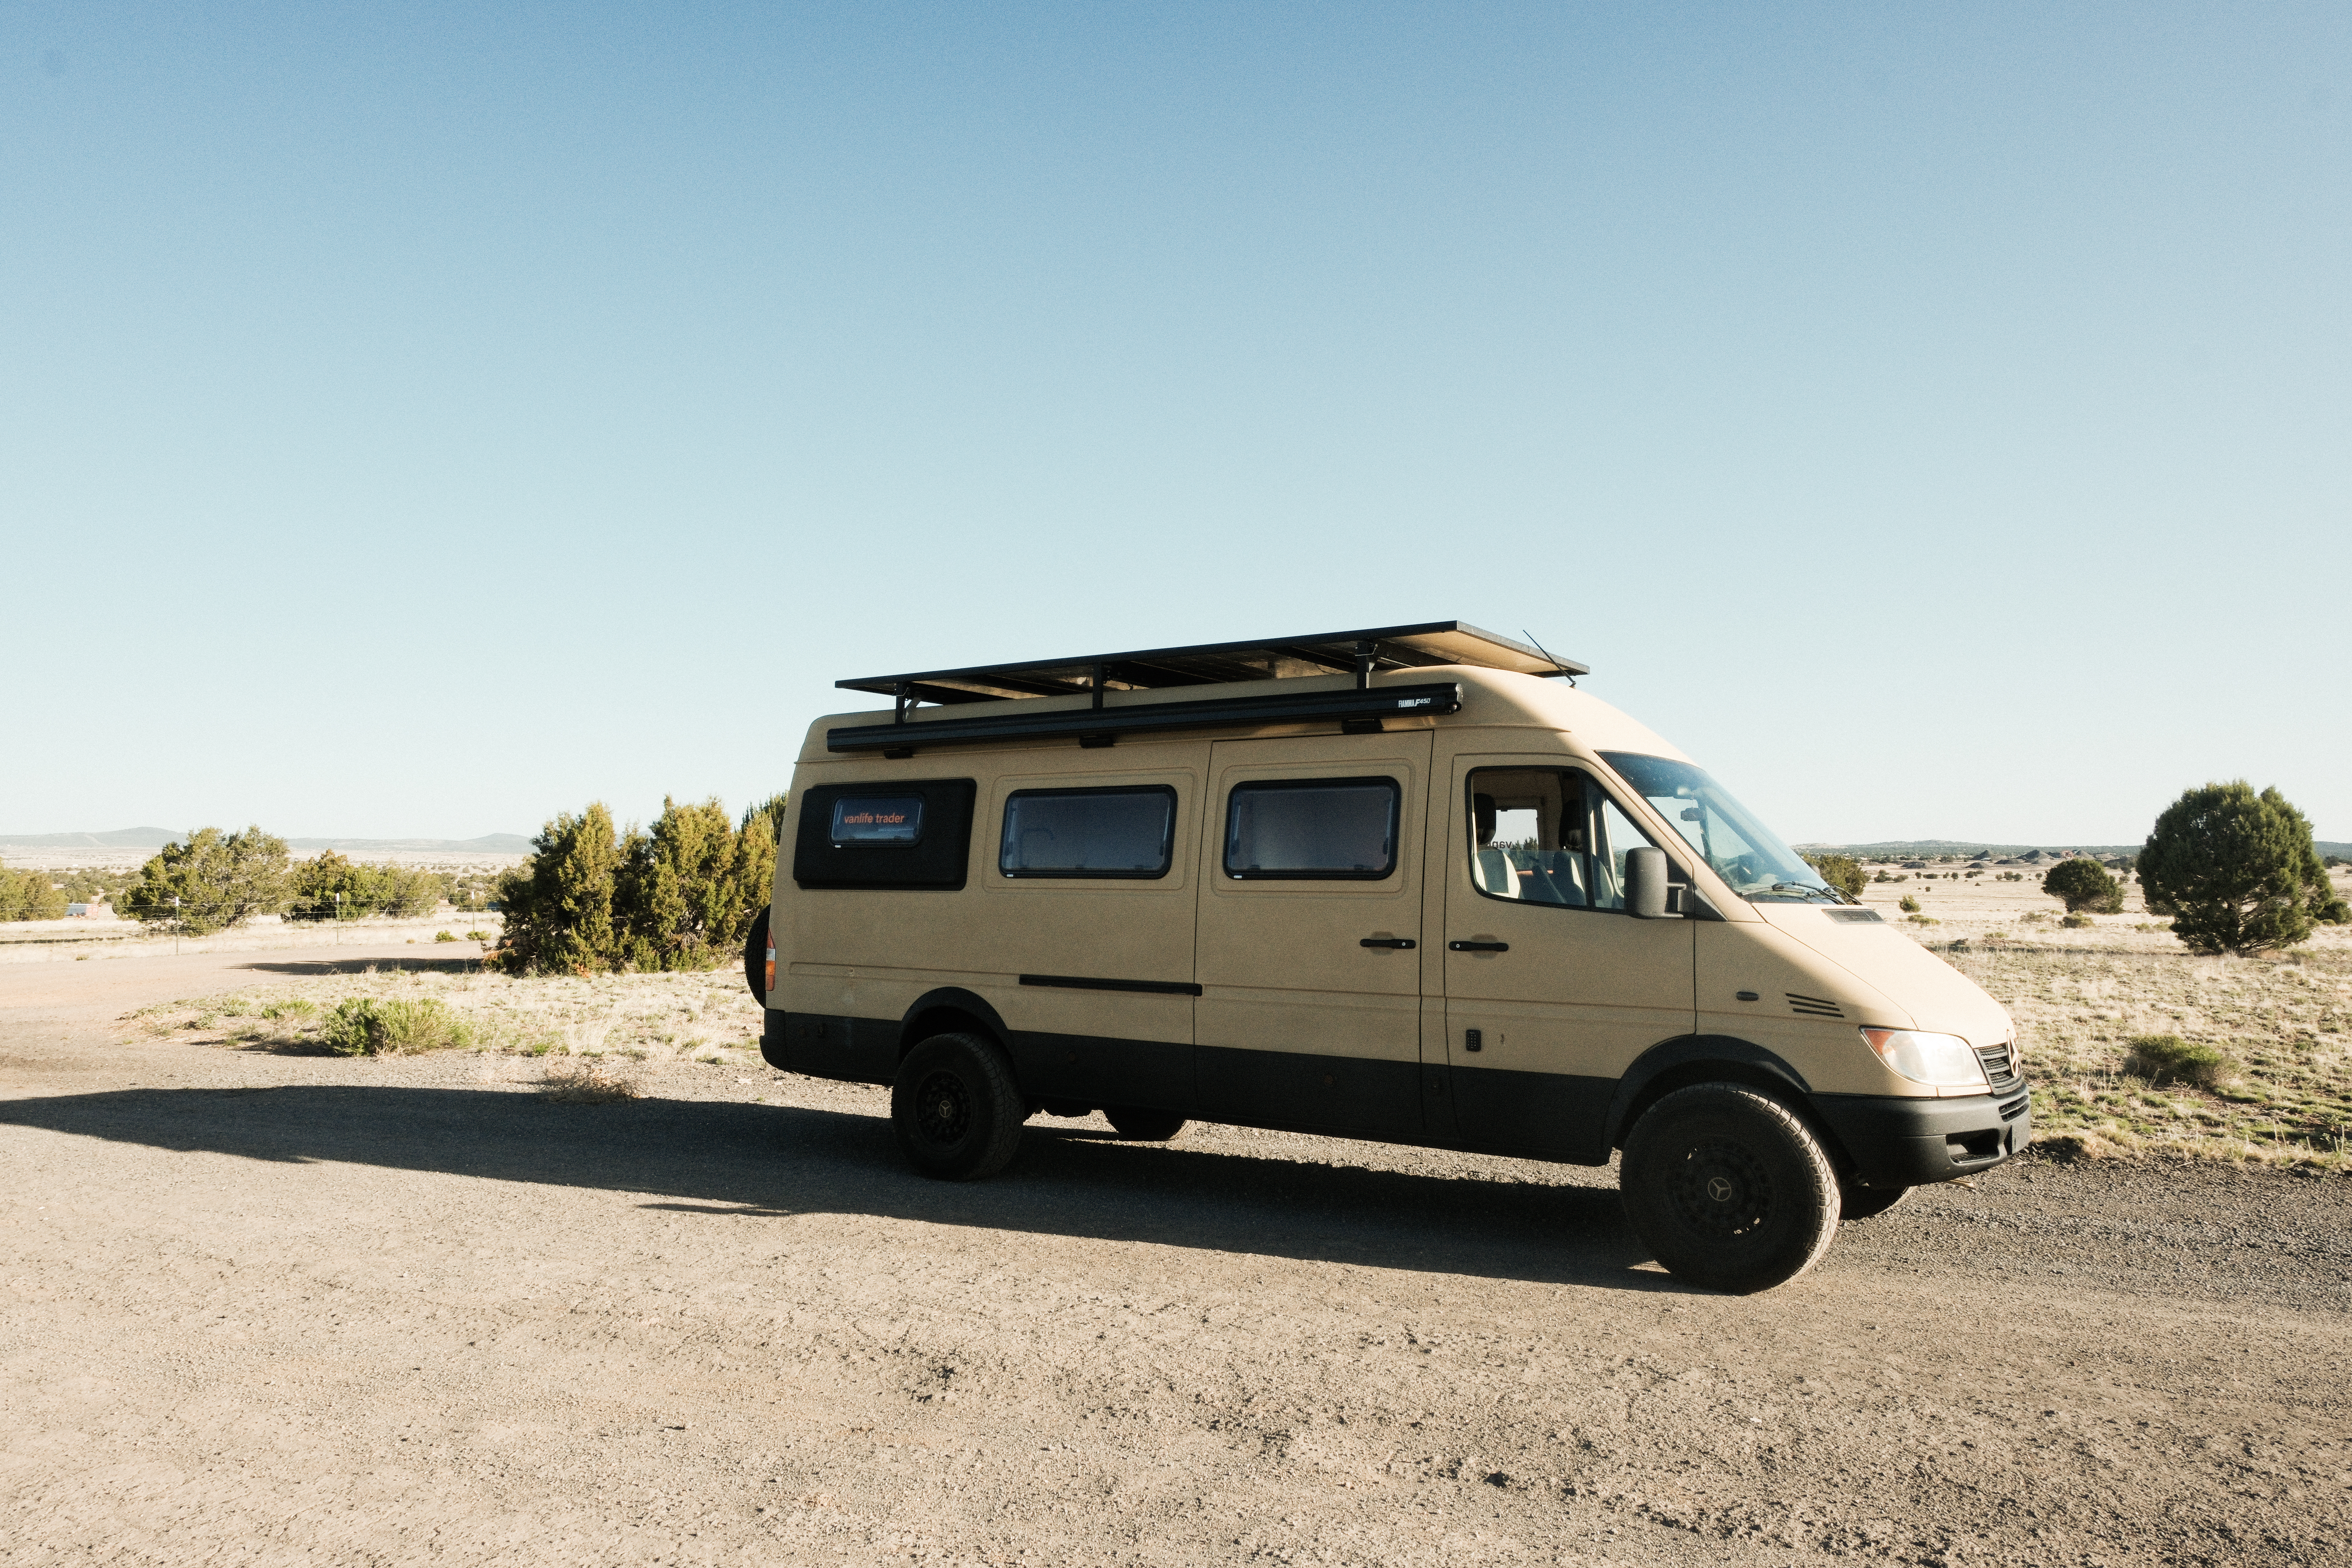
Exterior
- Flatline Van Company LoPro Roof Rack
- Flatline Van Company Front Fairing
- Flatline Van Company Side Ladder
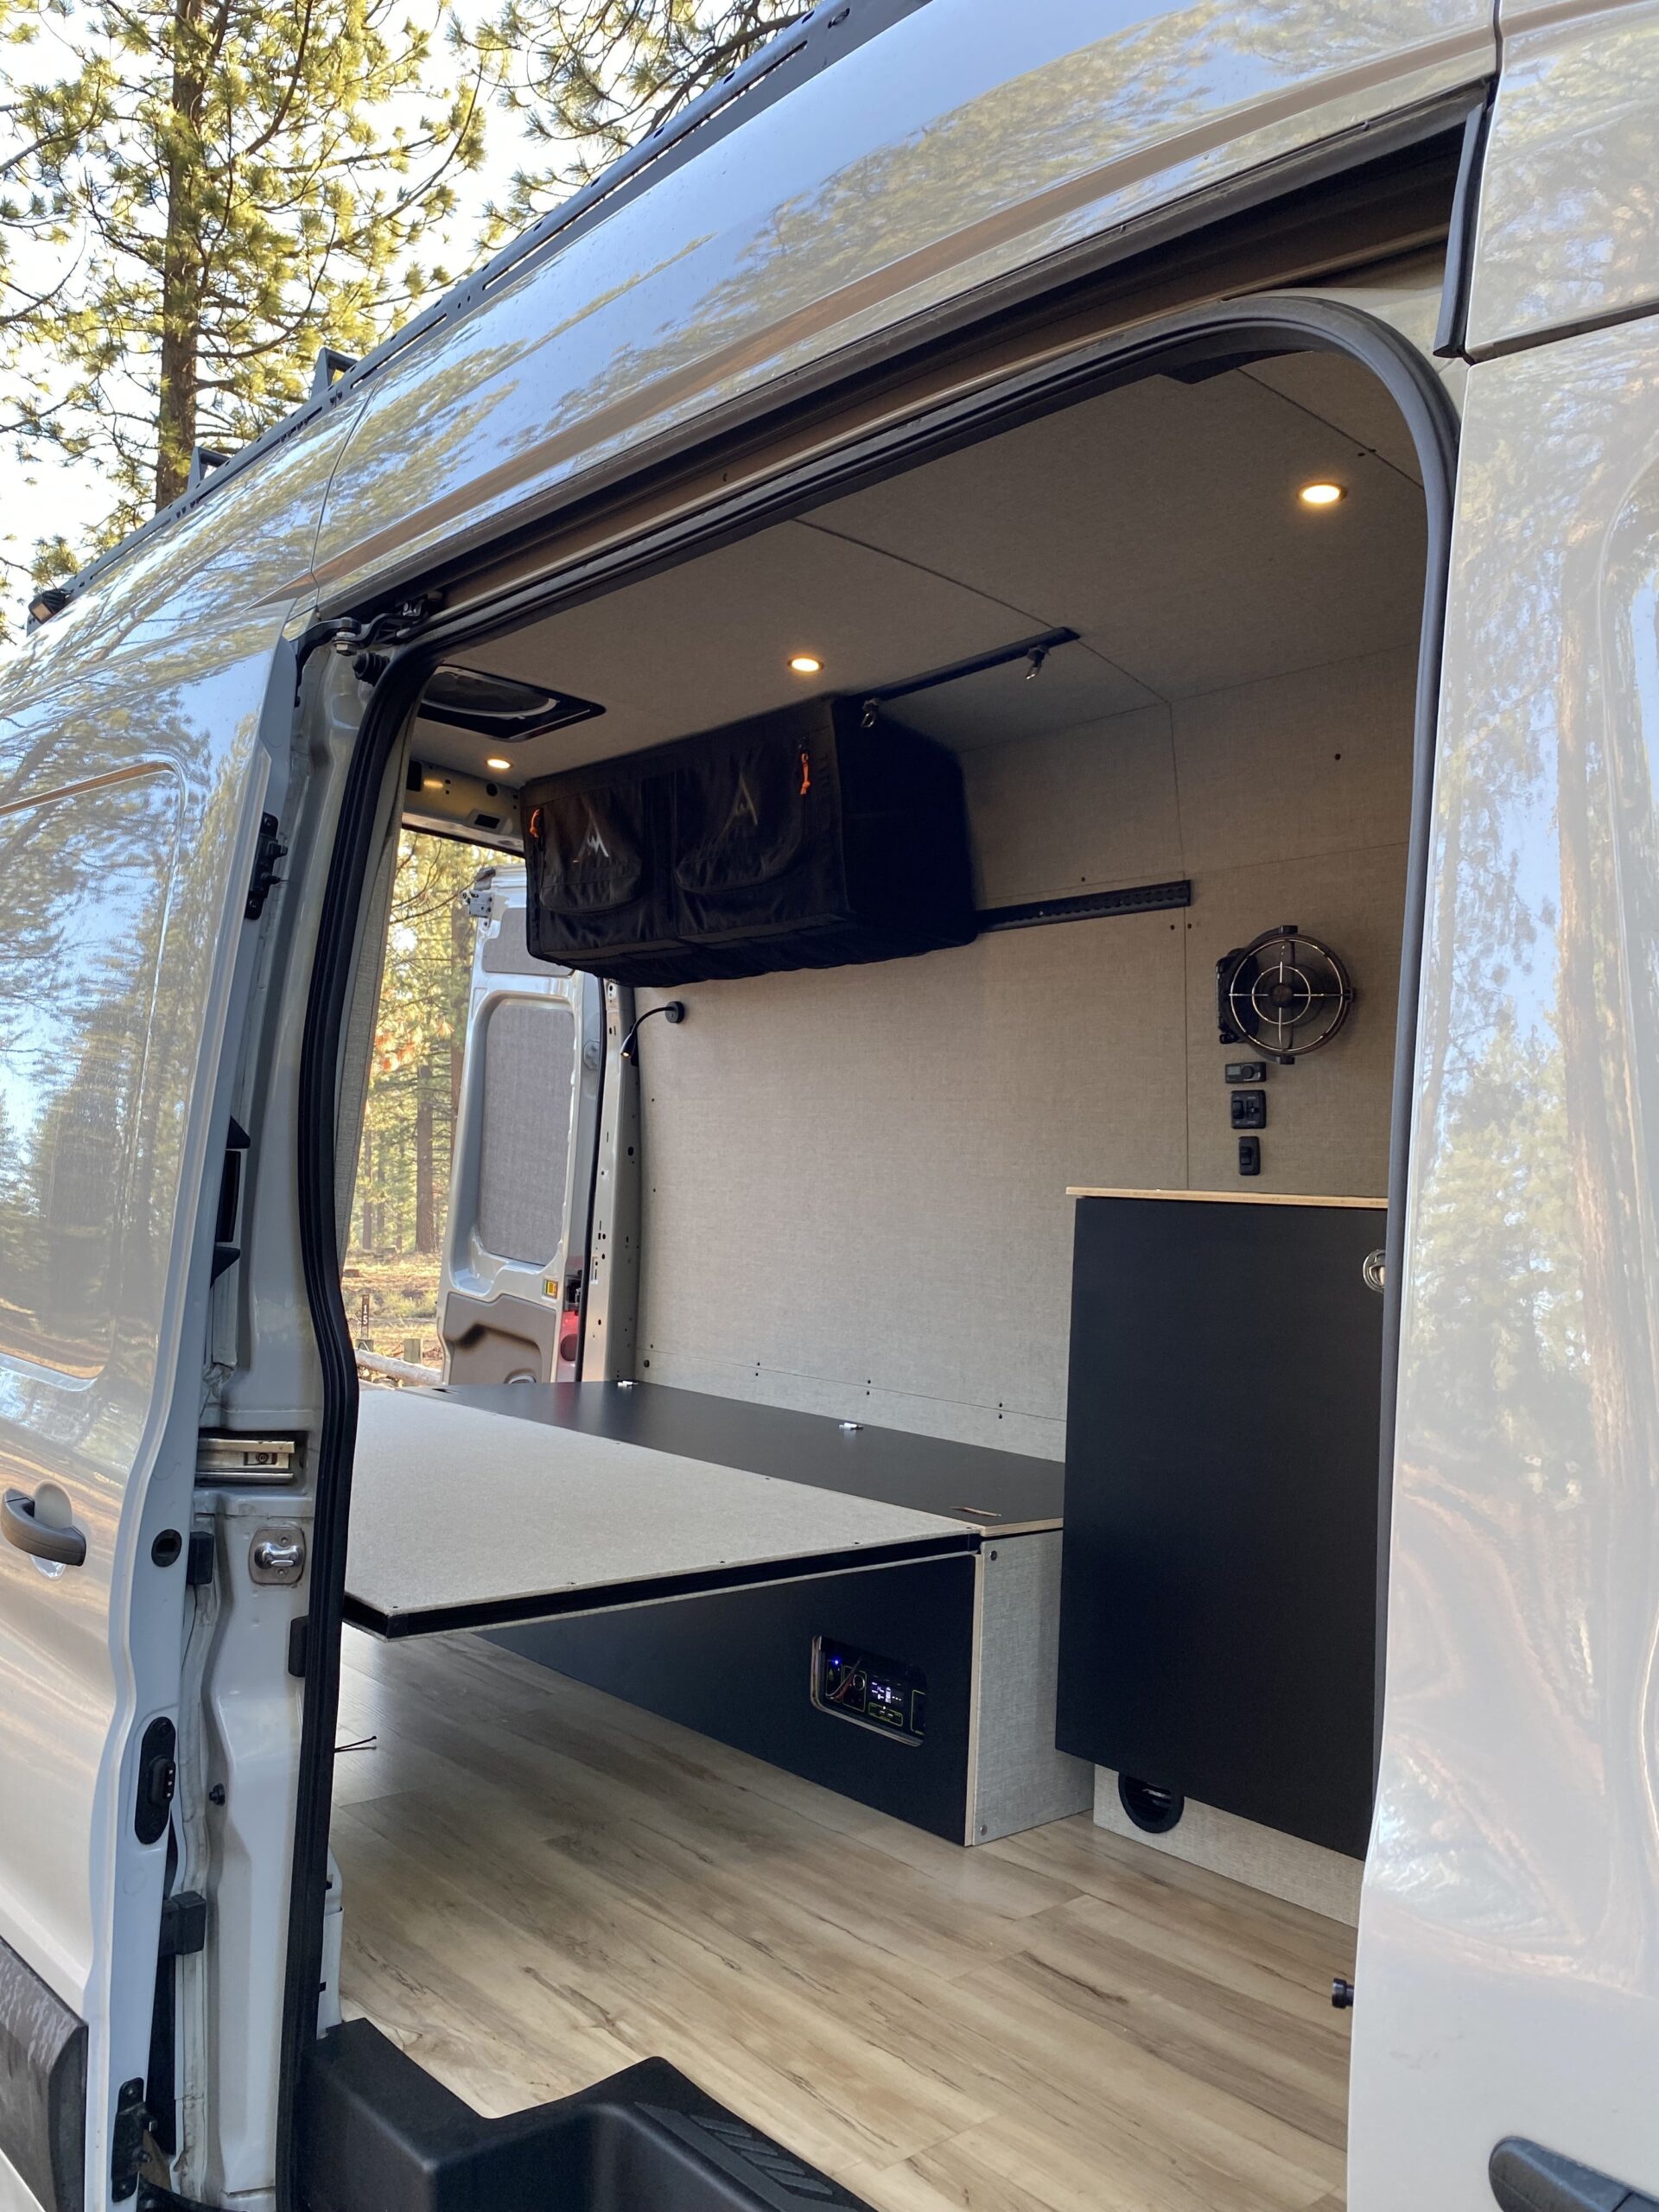
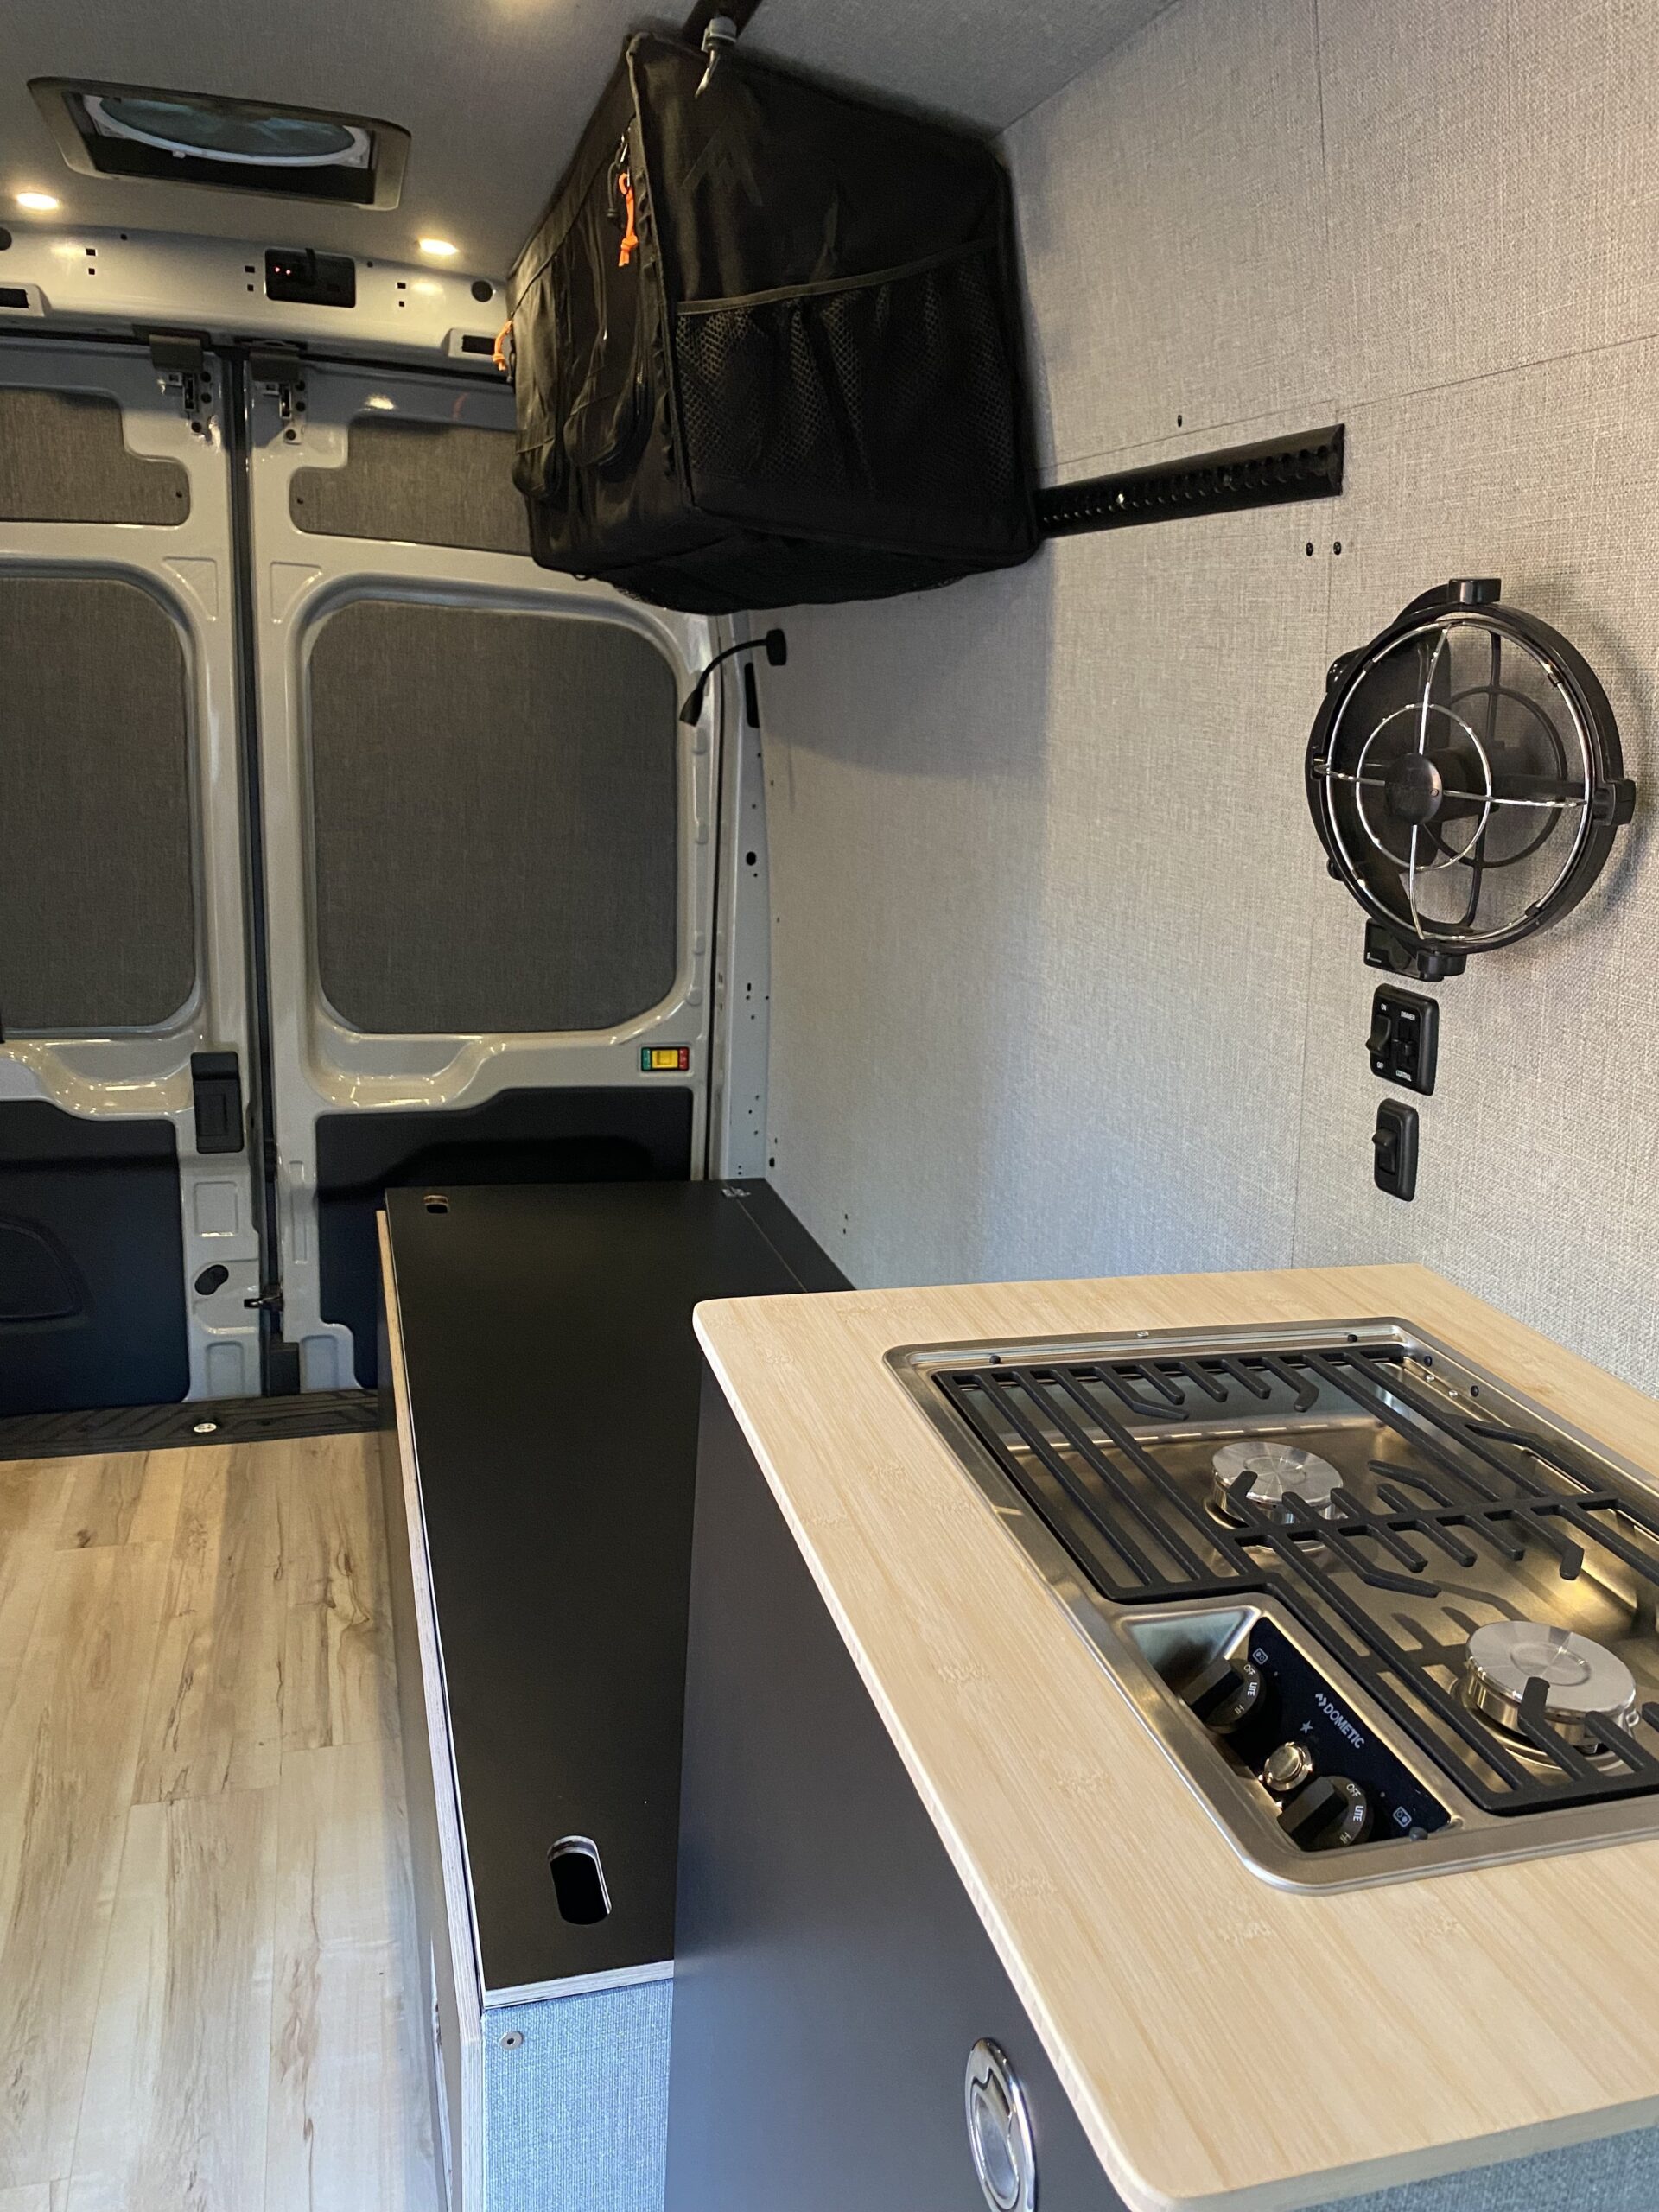
- Max Air Fan 7500K (Mounted with @Hein ‘s rearmost adapter)
- 16.5″ x 58″ Surf Check Deck”(TimberTech Azek Decking)
- (2x) Flatline Van Company Crossbars
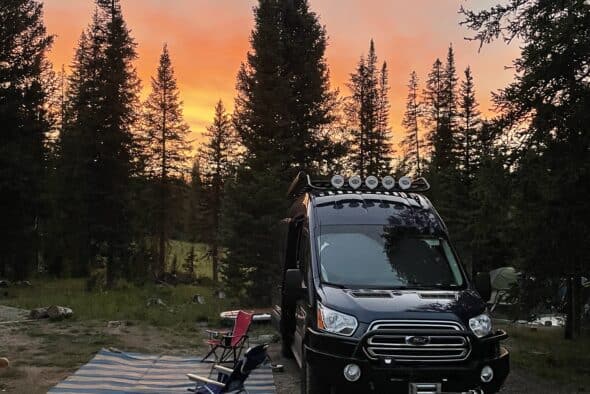
- (4x) Rigid 1×2 65 Degree Scene Lights (Controlled by interior on/off switch)
- (2x) NewPowa Solar 200 Watt (12v) Monocrystaline Panels
Interior
- Custom Vancillary Overhead Shelf (5/8″ Baltic Birch + Marathon Wool)
- Complete 3M Thinsulate Insulation
- 1/4″ ArrowPly Birch Wall/Ceiling Panels (+Marathon Wool)
- AVC Rig Wall to Ceiling Supports
- (6) Dimmer Controlled LED Ceiling Lights
- (4) Dimmer Controlled LED Garage Lights
- (2) Accessory USB/12v (Cigarette) Outlets
- (1) Accessory 12v (Cigarette) Outlet
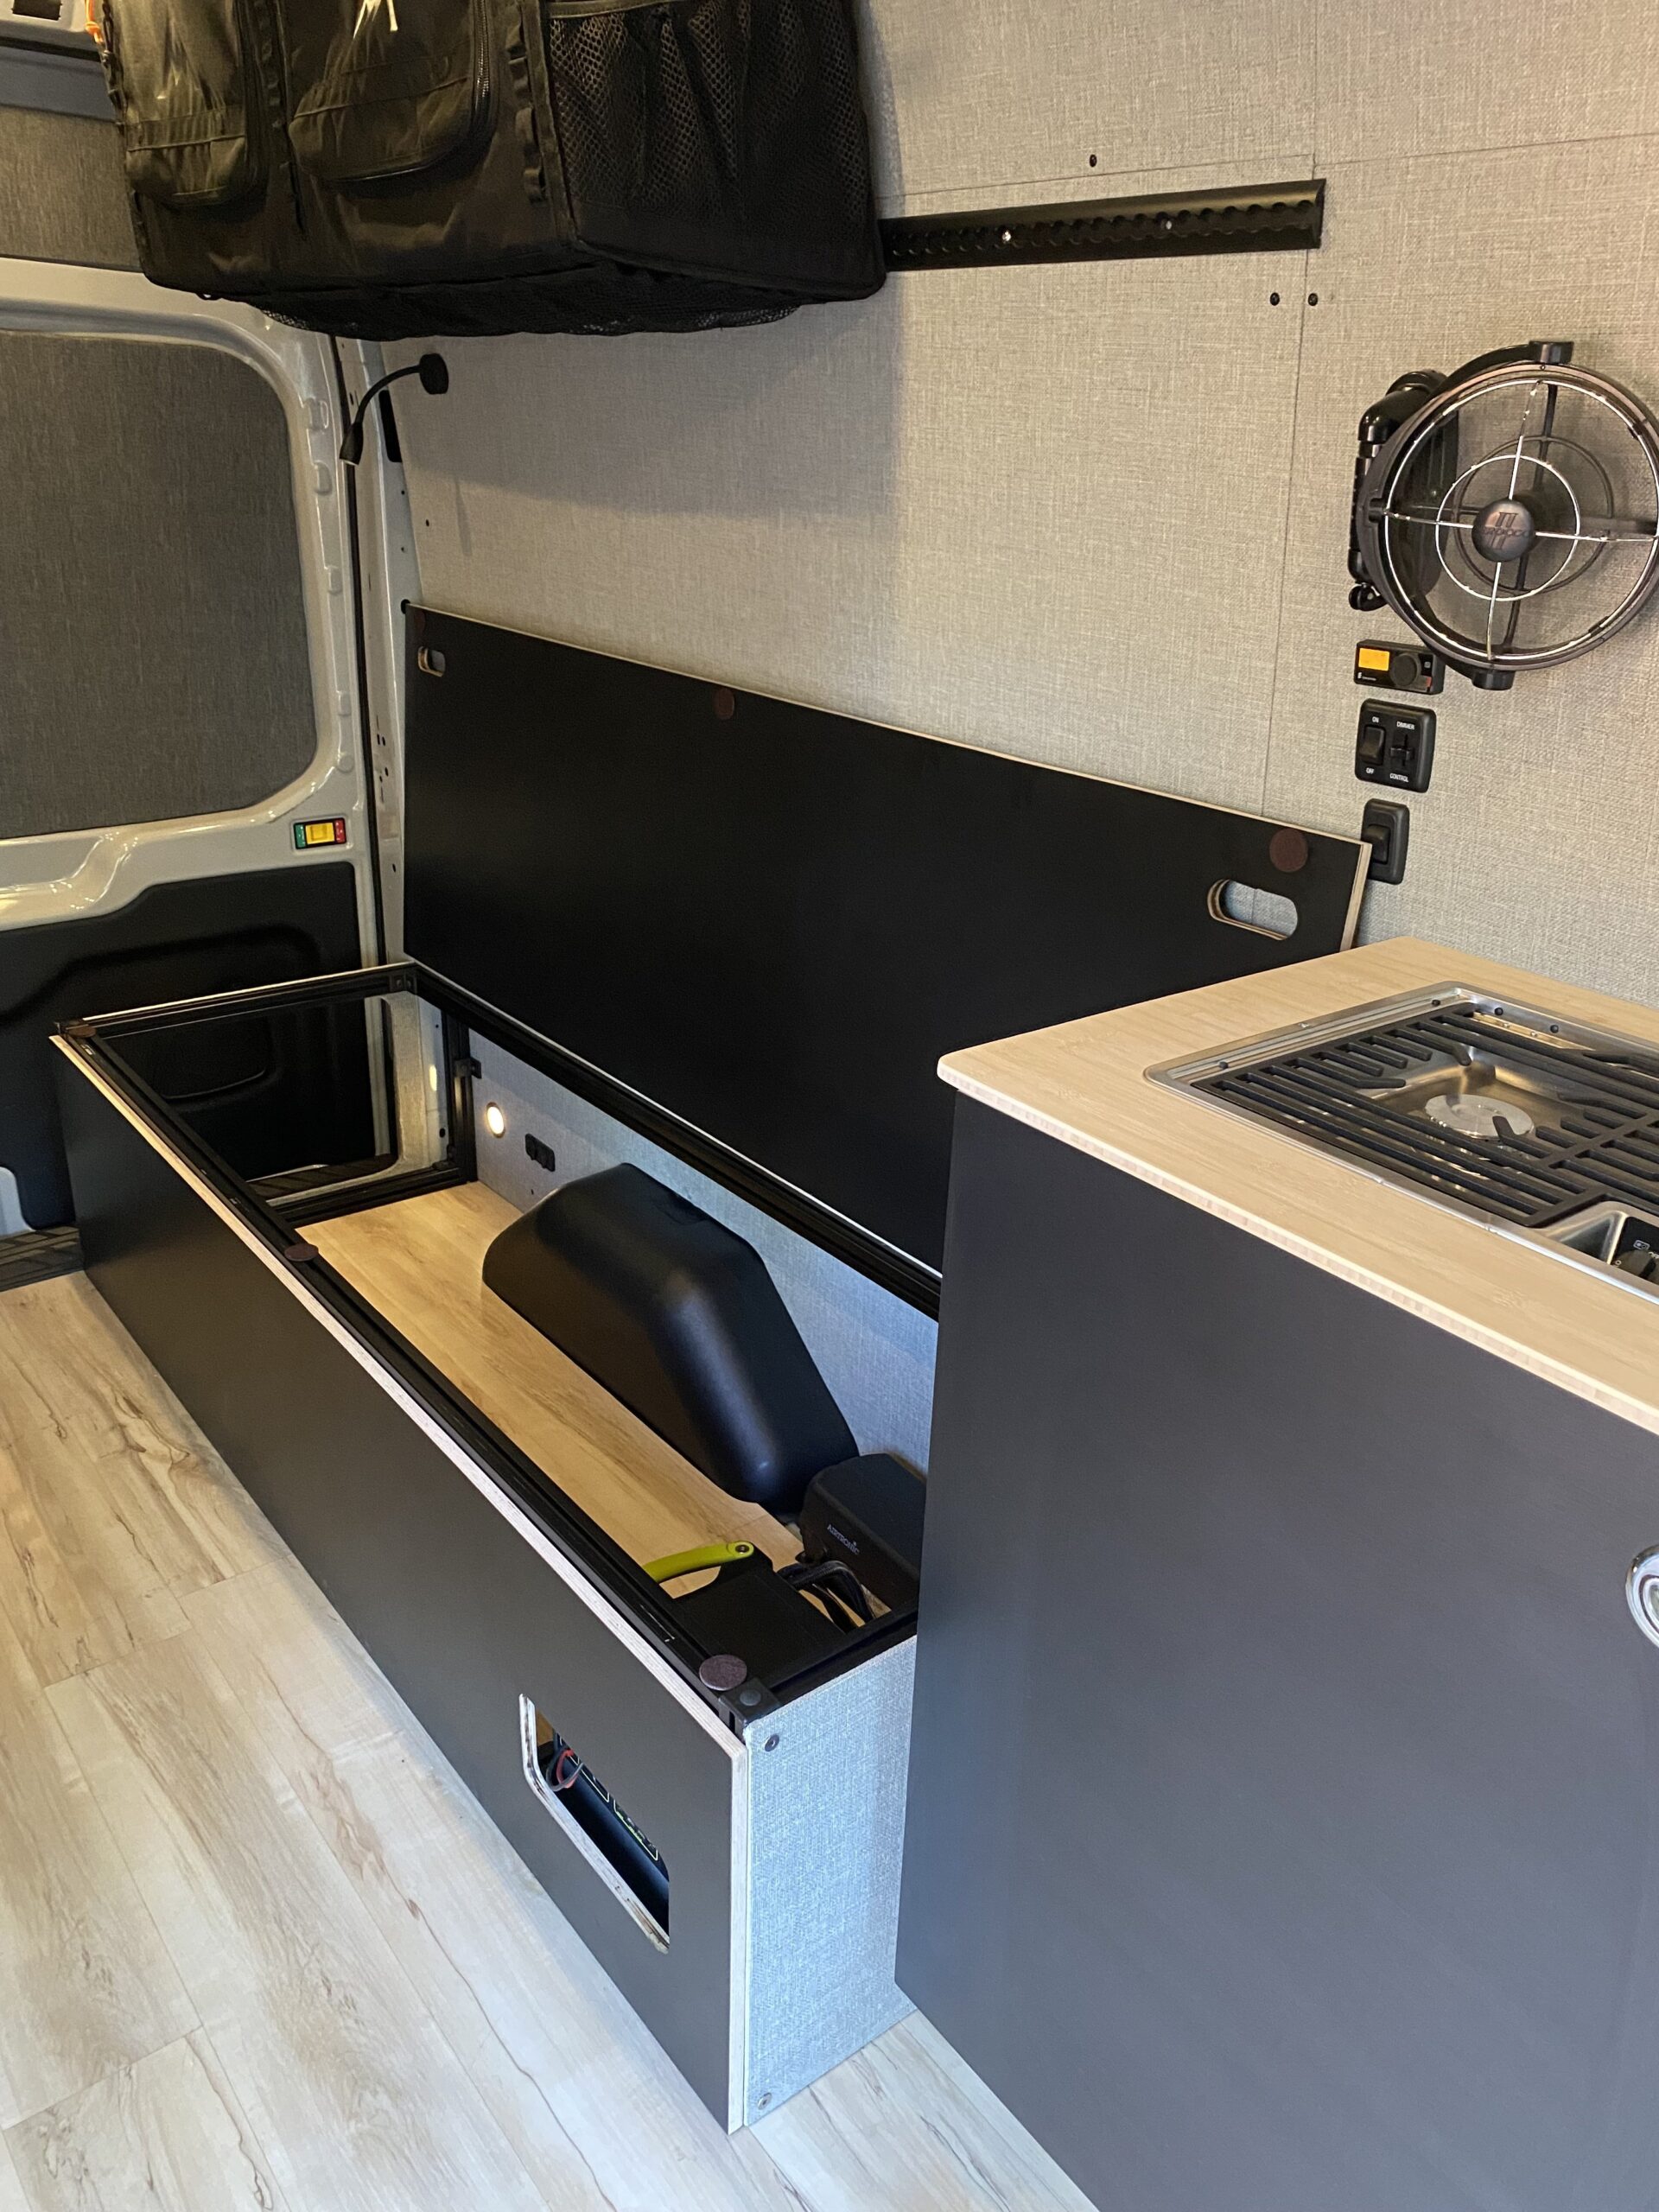
- (3) Sirocco II Fans by Cafarmo
- Custom Surface Mounted L Track by Tec Vanlife CA (Adventure Wagon Dimensions)
- (1) Adventure Wagon Mule Bag
- Goal Zero 1500X Power Station
- Goal Zero Car Link (V2)
- Custom PowerWerx Solar Cable
- Custom PowerWerx Anderson Connector Cable
- Blue Sea (5026 ST) Blade Fuse Block
- Espar Airtronic M2-B4L (with Ford Transit Standpipe) via Espar Parts Michigan
- Dometic Two-Burner Cooktop
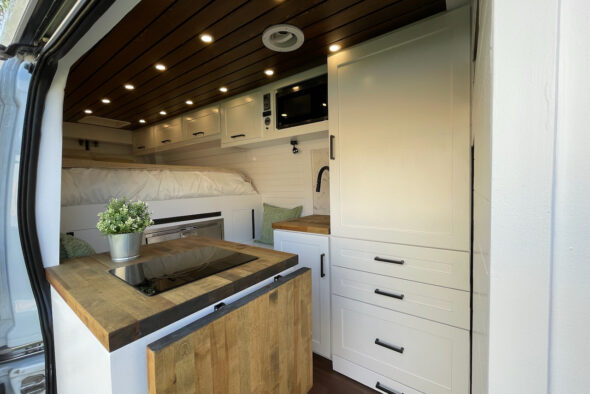
- Custom (15 Series) 80/20 Galley (Bamboo Countertop & Door with WilsonArt Laminate)
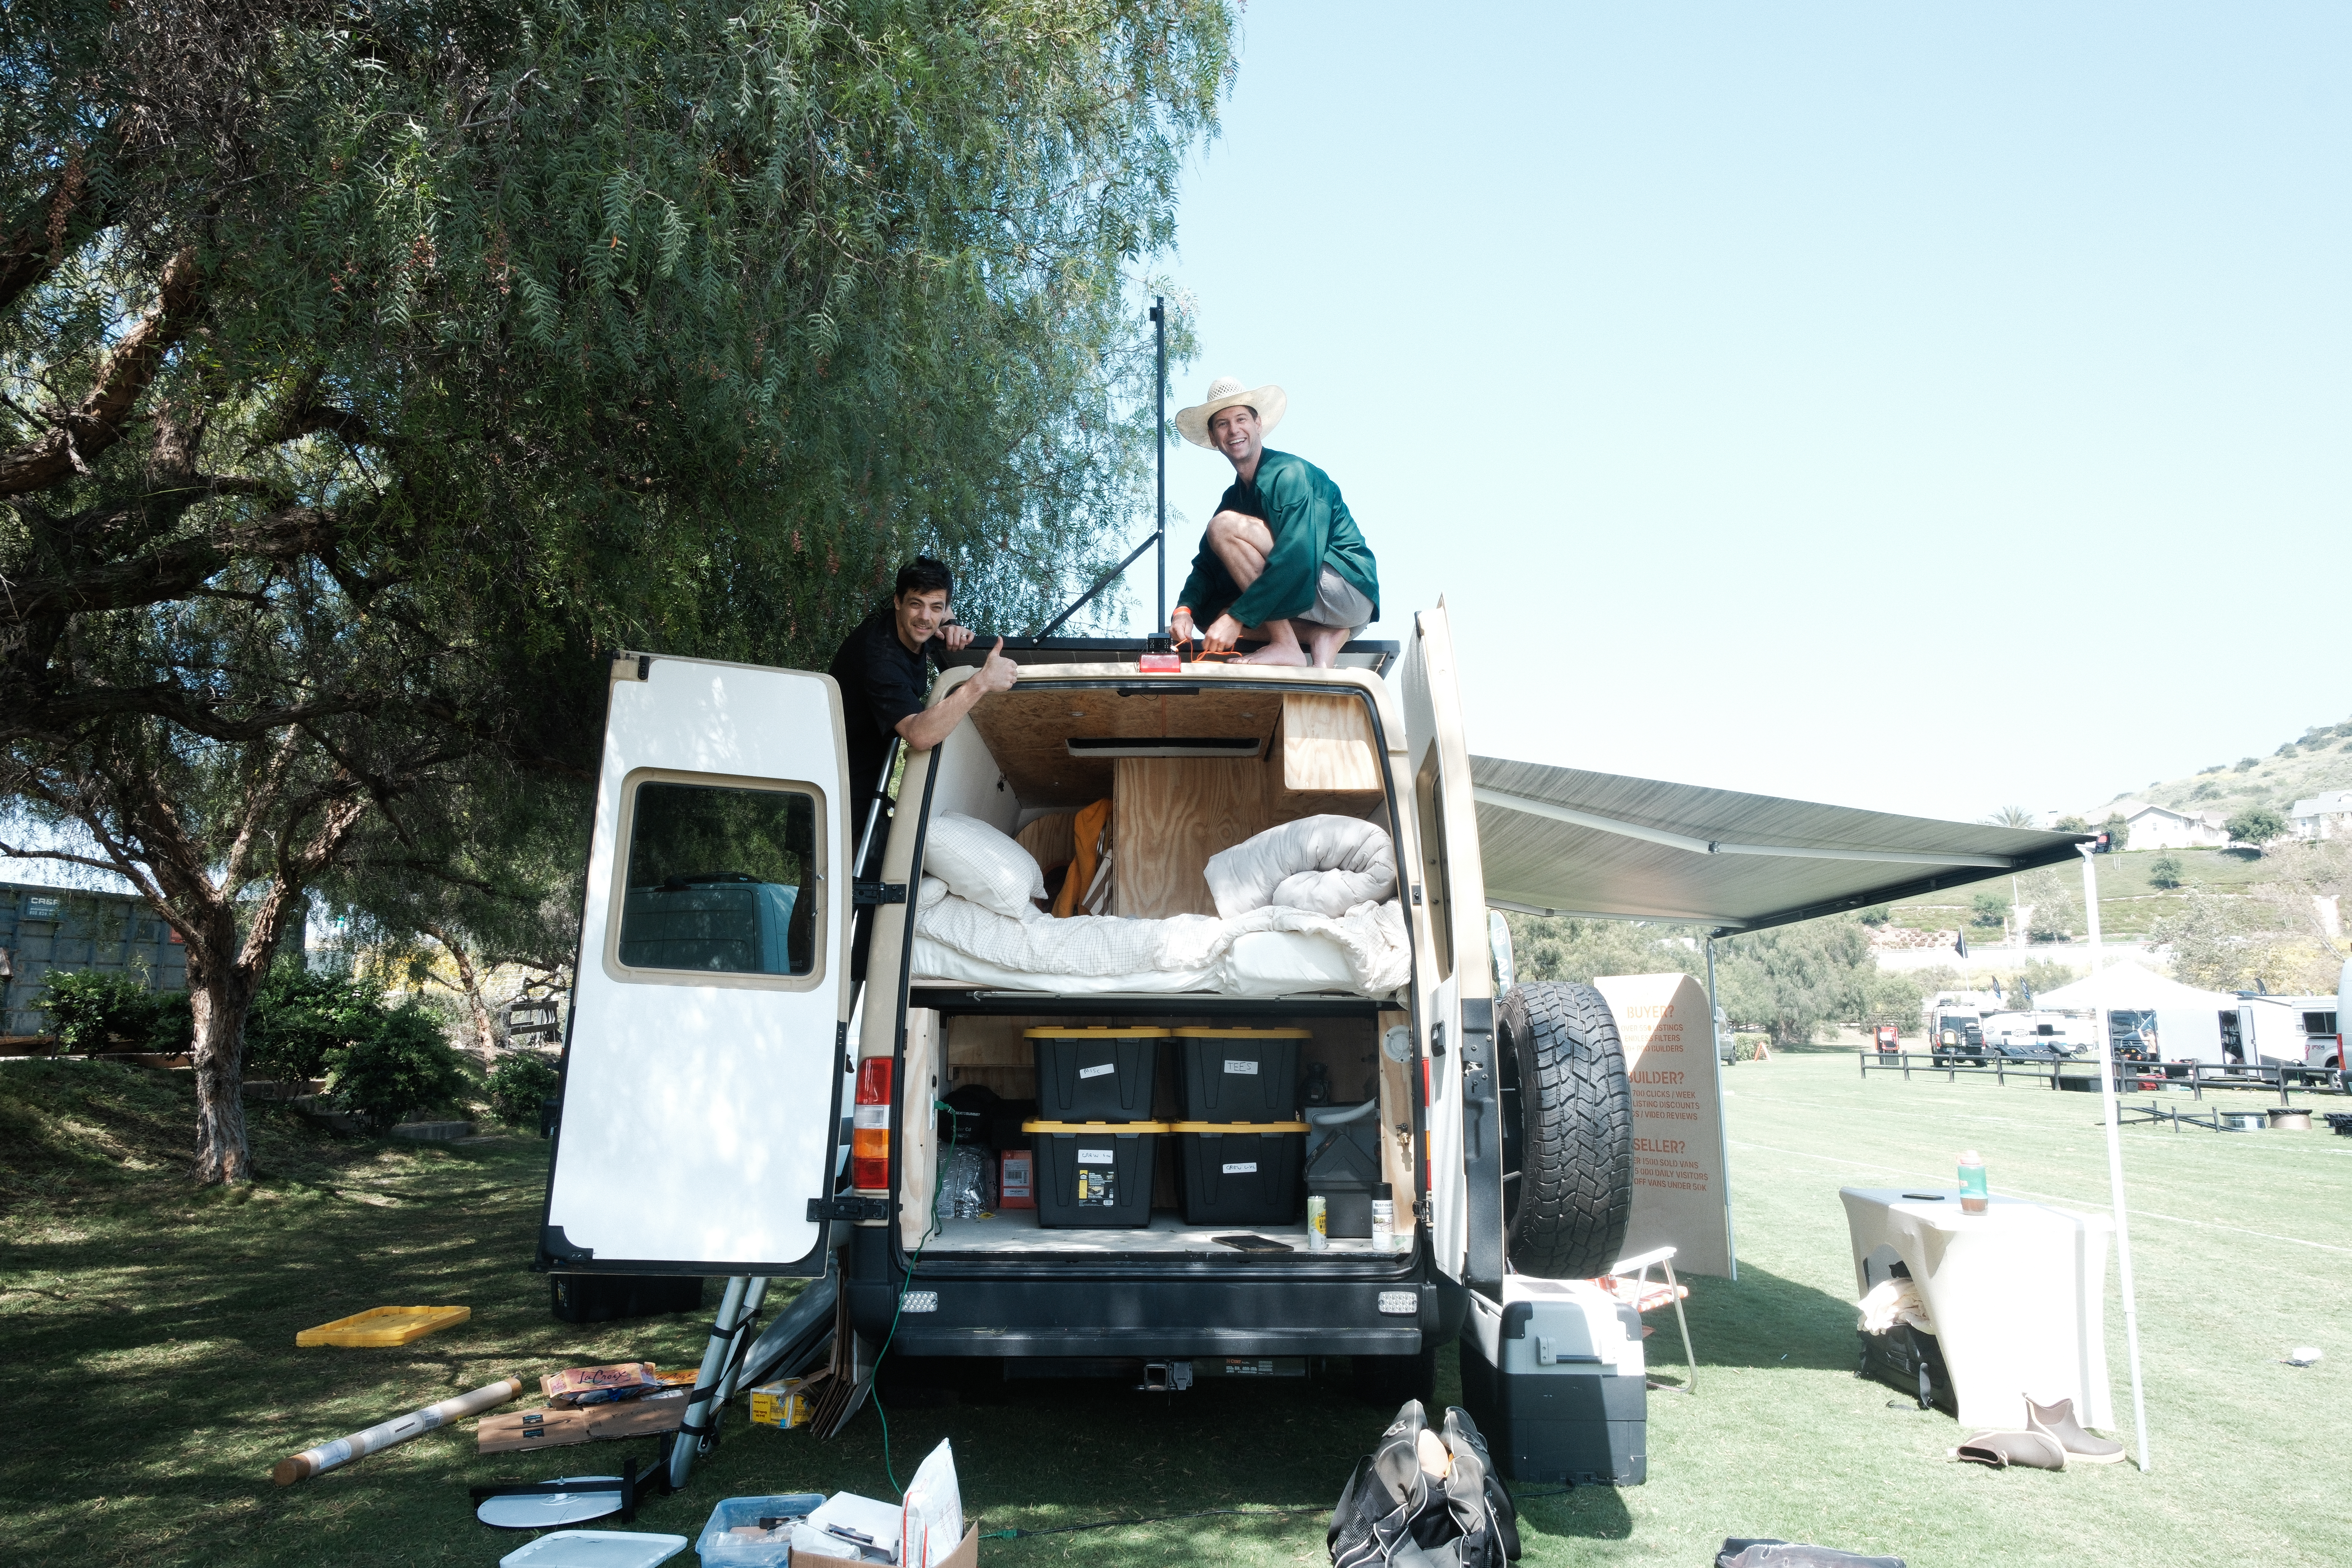
- 40″ x 76″ Folding Mattress for the “Bed”
- 25″ x 76″ Folding Mattress for the “Couch”
- (Removable) Dometic CFX3 53L Fridge
- One of a Kind Couch/Bed (15 Series 80/20, 5/8″ Baltic Birch Plywood, 1/4″ ArrowPly Birch, Marathon Wool, & WilsonArt Laminate)
- Custom Rear Door Insulation Panels (Sunbrella)
- 1/2″ ArrowPly Birch Subfloor and Luxury Vinyl Plank Flooring
- (2) Adjustable (12v) Reading/Mood Lights
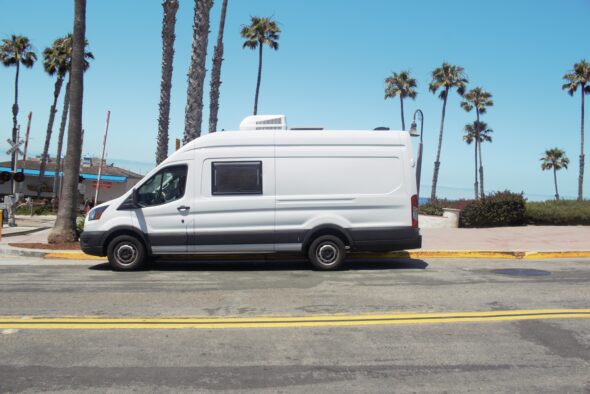
The Roof
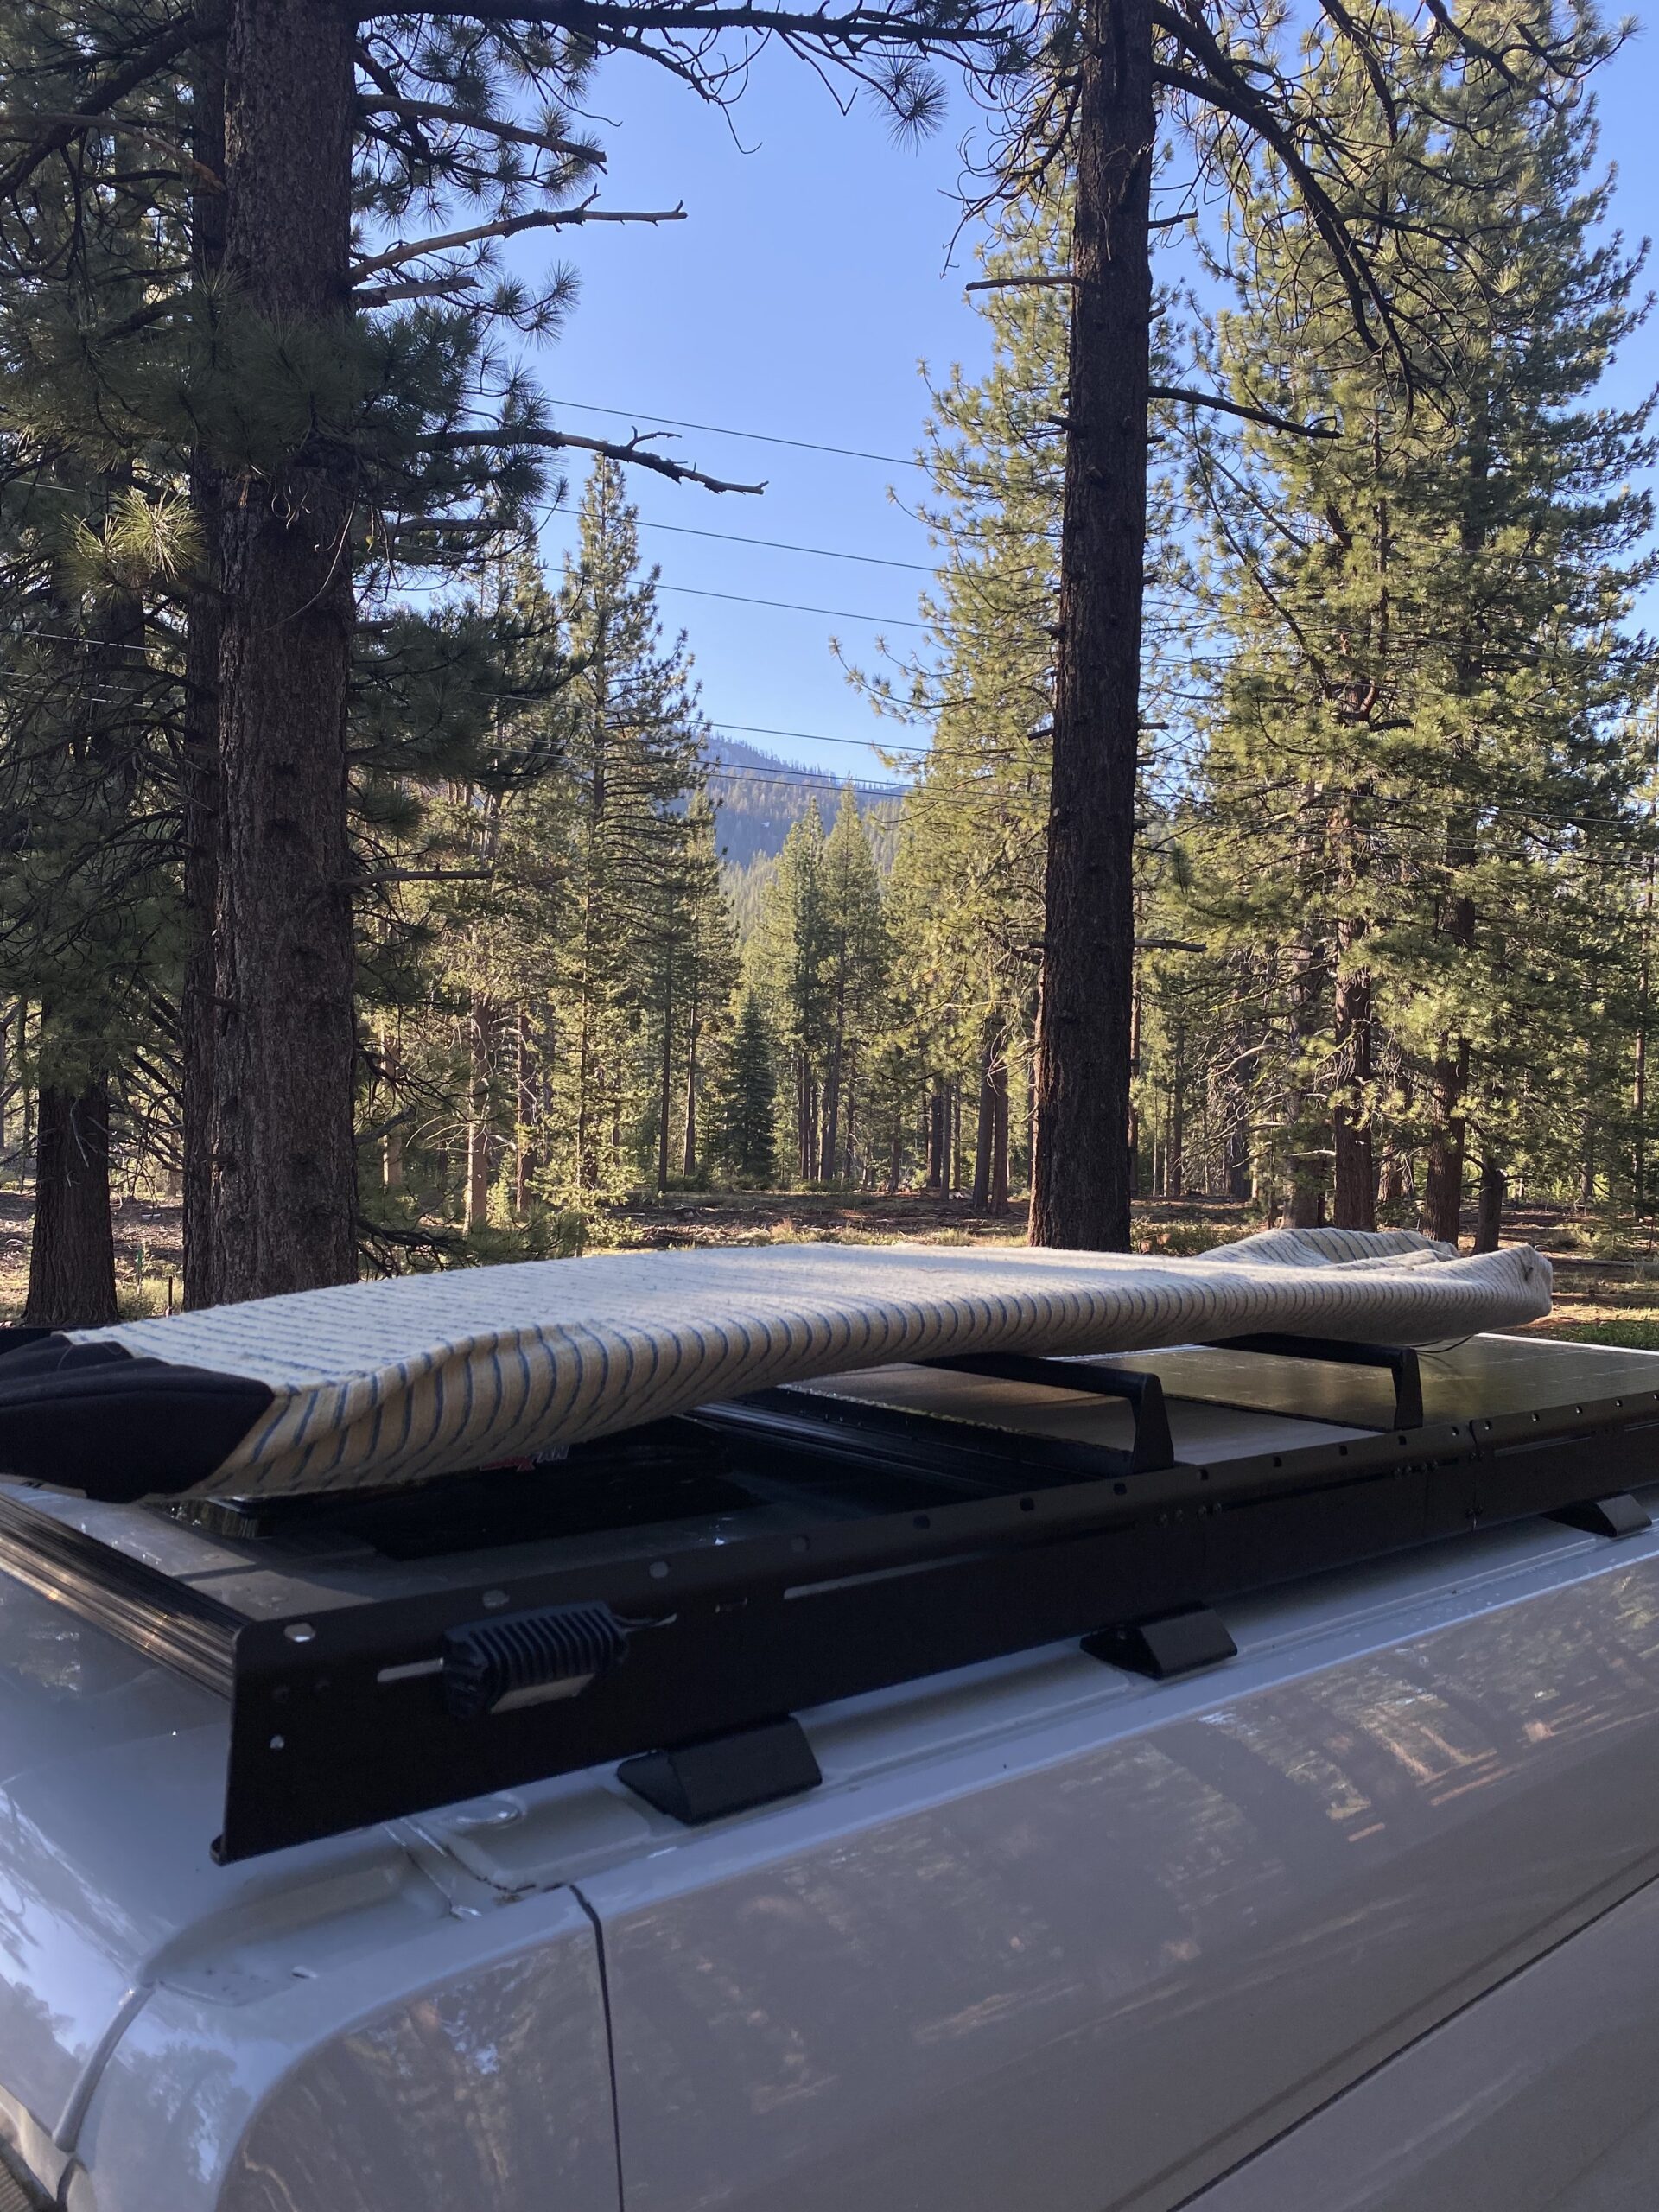
The Flatline Van Company roof rack is the foundation of our exterior build out. Here in Tahoe it’s essential that we have a way to clear snow off of the roof. I have not seen a better solution for snow maintenance than a side mounted ladder. A rear mounted ladder does not allow for pushing snow off the front half of the van – the most critical for safe travel living in an area with snow. This process is made even easier with our roof top “maintenance/surf check” deck. I can walk up the ladder, sweep snow from the deck, stand on the deck, and continue pushing snow off of the van from there. It is safe and effective. The alternative is driving around town with up 30″ of snow on the roof of the van like a jackass.
The side ladder leads directly to the deck with access to the FVCO cross bars. Standing on the deck, it’s simple to strap surfboards/anything else to the cross bars without standing directly on the thin sheet metal of the van roof. Without the deck, taking/strapping things on and off the cross bars isn’t very realistic. I installed cross bars from FVCO made for the Sprinter that are shorter than the full-width Transit bars to allow for easy access getting onto and off of the roof deck.
The four exterior lights (controlled by an on/off switch inside the van) are one of my favorite features. Everyone loves them at camp when the fire danger is too high for a campfire but we’d like to stay outside hanging out after dark. A lot of folks copy the Winnebago (Revel) and mount them directly to the van body but in my opinion, any time I can avoid drilling new holes into the exterior I do. If you start paying attention you’ll see plenty of crooked and unlevel exterior lights on vans. The lights are much better suited for long term use when mounted directly to the FVCO roof rack. This also means the wiring is accessible for maintenance instead of buried behind the insulation/walls of the van.
We’ve got 400 total watts of solar on this build. The two 200 watt panels from NewPowa fit perfectly on this rack. Mounting them all the way forward means that clearing snow off of the front of the van with a large broom is very quick and simple. The front 1/5th of the roof rack sits over the area of the van where you cannot mount a fan so it makes sense to fill that space with solar. The idea behind having 400 watts of solar is to keep our batteries at 100% all day long so that we go into the evening fully charged. That means we want to run our MaxAir Fan, interior fans, fridge, and charge any devices we have while the van is stationary. Another benefit of having more solar than we “need” is that we can cover up the majority of one panel when our longboard surfboards are on the roof and still have another panel to charge the battery.
Electrical System
All of the overly-complicated power systems concocted by YouTubers and copied by van builders are nice but I wouldn’t want to buy a van with a system like that and expect to be able to trouble-shoot that system or rely on it when you need heat. I’ve been building the simplest power system possible for years now and I believe it’s the best system for anyone that’s not an electrical engineer. I love our Goal Zero 1500X. It is the prefect size to power this rig. If you wanted to upgrade to a 3000X or even a 6000X there’s ample room and it would be as simple as disconnecting and reconnecting the a) solar input b) car charging input and c) the 12v fuse block output. The system is designed to stay 100% charged during day time hours via charging while driving and solar and support power consumption through the night running the fans, fridge, heater, and device charging. It works effortlessly and is easy to expand if necessary. All of the information that you need from the system is clearly displayed on the face of the Goal Zero unit. The unit includes USB chargers, a cigarette outlet, and 120v outlets. We’ve powered shop vacs, miter saws, electric kettles and dozens of other items with no issues. The unit is easy to access if needed. I’ve pulled out the entire Goal Zero and walked it down to my boat dock to provide power to a bilge pump to help a neighbor – not something that you can do with most rats nests of van electrical systems.
Electronics
There are six dimmable LED lights in the ceiling of the van controlled by a dimmer switch above the galley. Six lights are enough to see well when the lights are on their full-brightness and few enough to relax when the lights are fully dimmed down. There are two reading lights in the rear of the van with flexible goose neck arms that can be pointed in any direction. In the rear of the van there are combination plugs including a 12v cigarette input, a QC input, and a USB-C input on the passenger side and the driver side. Behind the removable Dometic fridge there is a single 12v cigarette outlet. There are three (3) Sirocco fans throughout the van. One can be positioned towards the driver’s seat. One can be positioned towards the galley or the couch while seated. One fan is down low to move air for our dogs – this also moves heat nicely around the van during the winter. We enjoy having our fridge but it isn’t something that we find we need in the van 365 days/year. For that reason we made it removable. Behind the fridge are two climbing hangars that we use to secure the fridge while we’re driving. The hangars are bolted into the structural supports of the van using plusnuts and 1/4-20 bolts. This allows us to use the fridge on our boat or back yard or garage if it’s not in the van.
The Espar Heater
I installed the Espar Airtronic M2-B4L in this van in a location that would be serviceable and also reduce the length of runs of lines/exhausts to a minimum underneath the “couch.” The heater was purchased through Espar Part of Michigan with receipts available upon request. I do not trust other suppliers (Amazon) and Espar Parts of Michigan can provide warranty/service info if needed. To install the heater correctly, the fuel tank on the van is dropped and the fuel sending unit is removed so that a standpipe can be installed that draws fuel directly from the tank instead of relying on the auxiliary fuel port supplied by Ford. The heater is the most critical part of this build and was installed in only acceptable way in my opinion. The heater runs flawlessly at our home elevation of 6,700′.
The Couch/Bed
There isn’t much space in a non-extended Transit. In my personal opinion, installing a permanent bed that takes up 60% or more of that usable space is a great way to make sure that you won’t have much space to move around in the van – especially after installing a galley. Flarespace flares are nice but they still prevent you from being able to walk from the front of the van to the back of the van. Once you’ve experienced a van without a full-time bed it’s hard to sacrifice all of that usable space. That’s why I came up with this design. In reality, we spend more time using our van as a space to hang out/get ready for activities than we do sleeping – we’ve got a house to sleep in. Whether we’re getting ready to snowboard or go surf, having all that open space plus a place to sit down and get ready is amazing for our lifestyle. Getting back from a long day and being able to get into the van and sit on the couch and relax is an awesome luxury. The bed side and the couch side both have 4″ mattresses that fit them perfectly. The hinges on both sides were built to accommodate the thickness of the mattresses when the bed is folded up and the couch lid is lifted for access to the storage beneath. The bed is very light weight and easily managed by one person. There is no need for a second person whatsoever to fold the bed up and regain all that square footage of the van. A solo traveler could easily sleep on the “couch” side with the single sized mattress (76″ x 30″). The “bed” side has a full size mattress (76″ x 38″). Combined the bed that is created is huge and very comfortable.
The couch is constructed with 15 series 80/20, 1/4″ ArrowPly + Marathon wool, 5/8″ Baltic birch plywood + WilsonArt laminate, and stainless steel marine hinges. The bed is constructed with 10 series80/20, 1/4″ ArrowPly + Marathon wool, and powder coated hinges.
The Galley
We’ve built vans with sinks, combo sinks/stovetops, and even RV oven/stovetops. Over the years we’ve found that we don’t use/need a sink in our van. We use a cooktop consistently to heat up food and boil water for coffee so that’s what’s reflected in this build. It’s also important that our build tolerate well-below freezing temperatures without running the heater. I don’t want to have to run my heater every night 8 months out of the year to keep water lines inside the van from freezing and busting the next time that they’re used. We always bring a variety of layers and jackets with us on our trips since we mostly travel up and down California where weather fluctuates considerably. Instead of driving around with clothes hanging off of the l-track on the ceilings and walls, we like to have it all in one place so we built a hanging clothes solution into the galley and it’s one of our favorite features. The galley houses the hose from the Espar heater that is routed to the kick plate of the galley. If you’ve ever been in a van without a toe kick you know how uncomfortable it can be to get close enough to the galley to use the stovetop. Since the heater hose runs through the galley, there is a slight warming effect present to dry out boots/gloves hung from the closet bar. Additionally, the BlueSea fuse panel is housed in the galley where it is safe and easily serviceable if a fuse were to blow (although I’ve never had a fuse blow in this build and the electrical was completed prior to insulation/walls.)
We use a four gallon RinseKit Pro for our outdoor showers/bike wash/doing dishes. That’s more than enough water for our usual trips and we can fill it up anywhere. We don’t have to worry about having 20-30 gallons of water sloshing around in our van at all times when all we really need is four gallons of pressurized water that we can take in and out of the van as well please.
The galley is constructed with 15 series 80/20, 1/4″ ArrowPly + Marathon wool, 3/4″ bamboo + WilsonArt laminate, Blum hardwear, and a stainless steel marine slam latch.
L-Track
I used L-track in this build supplied by TecVans in Canada. I like how their track is flush against the walls and powder coated black directly from their factory. The track is bolted into the structural supports of the van and uses the same placement as Adventure Wagon and accommodates their mule bag overhead storage bags. The build comes with additional hooks that slide into the track and you can hang just about anything from them – even a hammock. The build includes one (1) Adventure Wagon Mule Bag but there’s room for a matching bag across from the current bag. The beauty of the l track and the hanging storage bags is that they are modular. Additionally, the L track supports the ceiling and middle wall panels so there aren’t sheet metal screws fired into every ceiling panel.
Floor and Walls
This subfloor is three pieces of sealed 1/2″ ArrowPly bolted directly into the floor of the van with luxury plank vinyl on top. All of the wall panels are 1/4″ ArrowPly wrapped in marathon wool using automotive headliner adhesive sprayed through a high pressure gun to both surfaces. Marathon wool that’s applied to plywood with other adhesives like 3M 90 will fail when exposed to heat. All of the wall panels were custom cut from Titan Vans templates and modified for a great fit. The fitment between wall panels and ceiling panels was achieved using AVC Rig’s wall/ceiling brace kit. Without this kit you’ll see significant gaps between the wall and ceiling panels that DIY builders try and cover up with sort of trim nailed into the ceiling panels haphazardly.
Insulation
I’ve had five years of reading forums and watching YouTube videos regarding insulation. I’ve settled on 3M Thinsulate throughout the van. It’s as simple as that. This build has thorough 3M Thinsulate throughout and has worked perfectly for our insulation needs – keeping the van cool when it’s hot outside and warm when it’s cold outside. There’s no gimmicky LizardSkin or spray foam or cheap insulation board from Home Depot in this build.