
Basic info
Kitchen Feature
- Sink
- Refrigerator
- Stovetop
- Electric
Living Space
- Vented Windows
- Battery Powered Off Grid
- Fixed
- Diesel
- 3500 watts
- Outdoor
- 350 watts
- Cassette (portable)
- Ceiling Vent
- Gray Water Tank
- 30gal
- Lithium
- Integrated / Custom
- 12v
- 200ah
Exterior Upgrade
- Hitch
Vehicle Features
- Backup Camera
- Upgraded Stereo
- Cruise Control
- Gray
Description
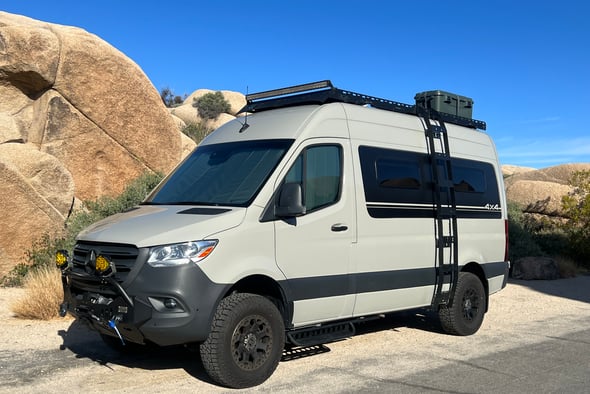
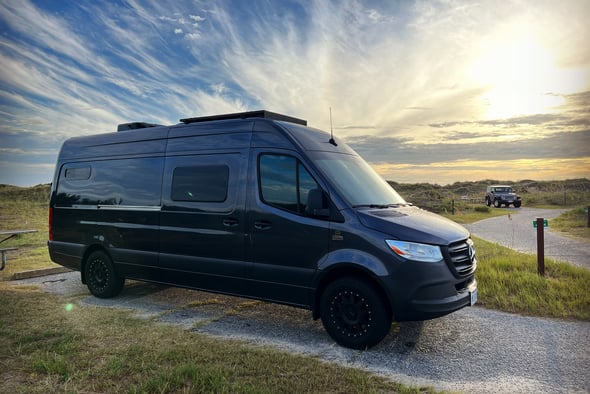
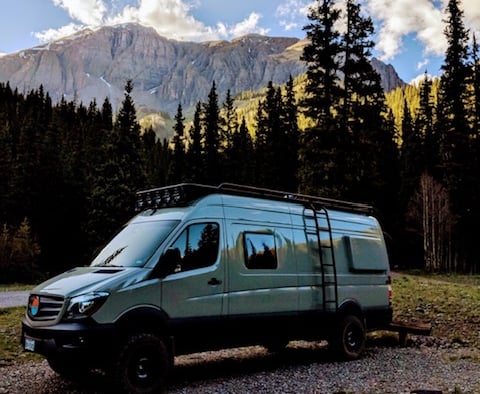
2021 Mercedes Sprinter 2500 144” WB High Roof RV Conversion
The van itself:
This is a 2021 Mercedes sprinter crew van 2500 that I bought brand new. It is 2wd, as I opted for the four-cylinder diesel which does not come in 4wd. The reason for this is that the mpg is significantly better than the six cylinder diesel or the gas options. I reliably get between 20-25 mpg, as opposed to 12-16 mpg on the alternative options, and that is fully loaded at about 7700 lbs, pacing with faster traffic, with fairly aggressive tires. With highway tires I’ve gotten as high as 27 mpg on the highway, fully loaded, going about 60 mph.
I have the title in hand. The vehicle has 49,xxx miles in on it. When I purchased the vehicle, I also purchased an extended warranty, that is transferable, that is for five-years; 100,000 miles. This means that the warranty for the vehicle will extend the warranty to August 2026, as I purchased it in August of 2021.
This van has been officially and legally reclassified from a commercial vehicle to a motorhome, which means that when you insure it, you can insure it for the entire value of the vehicle; including the build.
Commercial insurance, in contrast, only covers the value of the van itself (not the build).
In order to reclassify these as a motorhome, they need to meet specific criteria and be approved by the DMV.
This vehicle legally meets, and exceeds, the specifications required for it to be classified as a motorhome, according to the Oregon State DMV, and as such, it has the necessary license plates and registration.
This also means that if you were to finance this vehicle, you could finance it as a motorhome, which is a very different type of loan than a commercial vehicle loan. I believe there are up to 15-year options, bringing monthly payments down significantly.
This is the 144” wheel base. I opted for this chassis because it’s just under 20-feet long, so it can be parked in most normal parking spots, and parking lots. It is also short enough to be allowed in most campgrounds, as 20-22 feet is often the cut-off for smaller campgrounds, and the longer wheelbase definitely fits into this more-often-forbidden category.
It is just over 9’ tall, so beware of low hanging branches, low clearance drive-throughs, and most parking garages.
The current tires installed are the BFGoodrich KO2’s. They are a favorite for sprinters, as they are fairly aggressive, but without being too aggressive for highway driving. The tires are practically brand new, with only about 10k miles on them. The stock tires that came with the van were horrible so I replaced them before they were worn out.
I drove across the country on these tires, and it was surprisingly smooth, quiet, and efficient. When I hit snow or dirt, these are amazing, even with 2wd. The traction control is incredible, and can be turned off if you prefer drift-style snow driving, but due to the weight of this, I recommend leaving traction control on unless you are very experienced, and test this to see how it handles in a fish-tail.
I often like to wander off-path. I have owned multiple four-wheel-drive trucks, and off-road motorcycles. I have gone on Jeep trails in trucks, so I am quite familiar with off-road travel. This van does great in most conditions, including in snow. I do have chains, but I have yet to use them after four winters in Northern California and Southern Oregon.
I wouldn’t attempt Jeep trails, deep sand, mud, water crossings, or deep snow with this van, but just about everything else, it will do just fine; fire roads, dirt roads, shallow sand, maintained snowy roads, etc.
For a 7700 lbs van it drives surprisingly well; closer to a fully loaded minivan than a cargo van. Mercedes for the win!
The vehicle is equipped with all of the amenities that Mercedes has to offer on these. It has their version of OnStar (with subscription) with Mercedes ME, which can be used for things like roadside assistance, vehicle tracking (if it’s stolen), remote disabling (if it’s stolen), auto remote start, and climate control, etc, but I’ve never used any of these features. I also know where to disconnect the antenna for this. If you want to disable it, I can show you how. I leave it on in case it’s ever stolen.
It has a 360° camera view, backup camera, forward camera, blind spot assist, parking assist, adaptive cruise control, built-in GPS, heated seats, XM radio (requires subscription), full airbags, stability control, traction control, high-wind-assist, etc. All of these features can be turned off, except for the crosswind assist, which only kicks on in very strong crosswinds.
The stock speakers in these Sprinters are pretty horrible, so the very first thing I did was upgrade the stock sound system exponentially. This upgrade includes an external four-channel amplifier, 8” enclosed ported subwoofer, JBL door speakers, and a crossover network to make it a true three-way system.
I am a musician, sound engineer, and sound-system designer by trade for professional recording studios and commercial applications… So sound is important to me, and this system sounds amazing.
The subwoofer has a healthy presence down to about 45 Hz. The door speakers are JBL, and are used as the mid range cut off below 200 Hz, so there is no rattling in the doors from the Bass.
The tweeters are in the dash, and they produce all of the higher frequencies.
The result is a high-end sound system with a full range . It sounds amazing, at low and high volume…
The four-channel amplifier powers the L/R doors and tweeters with two of the channels, and the other two channels are bridged for an 8 inch mono subwoofer that is discreetly installed behind the driver seat with rubber grommets in order to decouple it from the vehicle. There is minimal transfer of vibrations from the subwoofer to the metal base of the driver seat, resulting in very clean, present bass.
The build:
This is the second Sprinter that I have built. It took me about a year to build this van in total, considering that I could not work on it full-time. If I was to work on it full-time, it probably would’ve taken me about 4-5 months to build.
I finished the build mid-2022, so I’ve had 3 ish years of 4-season usage to work out the kinks; which I have. There were only a couple, which I addressed.
The build is solid, and the functionality is incredible. The hardwood has all done what it’s going to do regarding expanding and contracting, and I’ve had the van in dry cold environments, and humid hot environments. Using true hardwood in vehicles like this can be tricky due to the Woods nature to expand and contract with temperature and humidity, which is why most people use MDF or plywood.
I used plywood for structural elements, but I used hardwood for most of the visible surfaces. This is because I like nice things.
Warranty on the build:
To be clear, I do not offer any warranty any part of the build; not because I am concerned that something might happen (I’ve used the van with no issues), but because I have no idea how you are going to use the van, or how well you take care of things.
I personally take very good care of my things, and this van is one of those things.
That being said, if you do have an issue with something, you are more than welcome to reach out to me for a simple consult.
If you have a major issue with something, there is always the possibility of you flying me out to address the issue. I would charge my normal rate plus travel for this service, but you would have access to the person who actually designed and built the van, if you want, as opposed to someone who would have to reverse engineer things.
This would also apply if you ever want to make any changes or upgrades. You are welcome to reach out.
Any future servicing or upgrades would be pending my availability, and I do not guarantee my availability. But most likely, I can help you out, or at the very least, help the person who services or upgrades the van build.
Whether I would charge for consulting with a local tech, or you if you are DIY, would depend on the level of my involvement. I’m very generous, but there’s a point where things are beyond generosity, and need to shift into a professional setting.
Storage:
Storage is key for me. It is actually what prompted me to build my own van initially several years back (my first sprinter build back in 2014), as I could not for the life of me find a prebuilt RV that could accommodate my storage needs.
There is a space underneath the bed that I call “the garage”. The space is accessible via the back doors of the van, and the space can accommodate large items. In my case, musical equipment, instruments, and tools. Sometimes an inflatable kayak, and other fun toys…
There are also six overhead cabinets, three locking pullout drawers, four narrow cabinets on the sides of the bed, a good sized cabinet underneath the drawers for food and utility storage, a shoe rack right inside the door, and under-bed storage that is accessible within the living space.
The bed is a full size custom frame on gas springs with soft close linear speed controllers to keep it from slamming shut. You can open the bed from inside the van, and access storage, the A/C evaporator, and the electrical system. The springs assist in lifting and hold the bed open, and the linear speed controllers control it as you close it. It does require some strength to open and close it, but nothing any healthy adult can’t manage.
Under the bed is also access to where the electrical system and auxiliary batteries are stored. So they are accessible from inside the van.
I also have a laundry basket that is positioned in the same area as the electrical system, so you can easily use this for laundry, or other items.
There is also some hidden storage, which I will only share with the person who buys the vehicle.
Lighting:
I am a bit of a nerd, if you could not tell already, and one of the consequences of being a nerd is that I have six lighting zones for a 20 foot van.
All of the cabin lighting is LED, non-flickering, 95+ CRI, 3000K.
Zone one is the house lights, which turn the lights on in the entire livable area of the van.
Zone two is the galley, which is a lighting strip with diffused light that only casts light onto the sink and stove area. As you’re standing at the sink, the light source is not visible. You only see the result, which is a very well lit Countertop with practically no shadows due to the diffused light.
Zone three is what I call an accent light, that is nice to use as a nightlight if you are up and doing things in the van after dark.
Zone four is the bed area. This is also under cabinet LED strip lighting with diffusers. If you are lying in bed, you will see the strip lights, however, if you are sitting in bed, you will not.
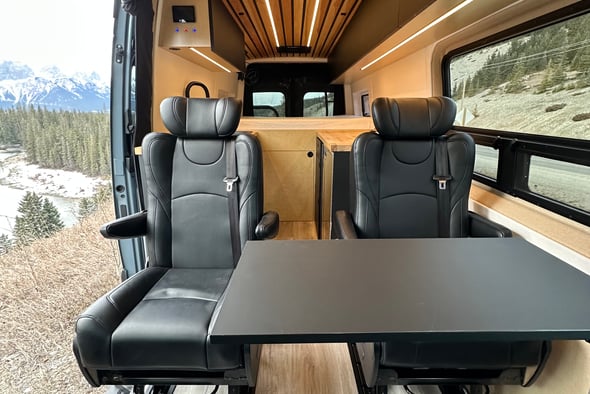
Zone five is a spotlight over the middle of the bed/tatami. Yes the bed is also a Japanese tatami. If you are unfamiliar with what a tatami is, it is a Japanese mat on which you can sit. I like to sit and poor tea, or eat on a tatami, so I can roll up the mattress topper, store it in the front seat, and set up two cushions with a little table in between, and sit and have tea or food with two people on the tatami.
Zone six is night lights. These lights are independently controlled from the rest of the zones, so they can be on 24 hours a day if you like, at whatever brightness you like. These are all of the in-cabinet lights, which are on reed (magnetic) switches, which means that they are only on when the cabinets are open, and turn off when cabinets are closed. There are also nightlights underneath the bed, so when you open the bed, it turns them on automatically so that you can see what is under the bed. There are also lights in the step-well by the sliding door, and these make it so that at night, you can leave them on, not see light while you’re sleeping, but if you get up and have to get down to the floor, you can see the floor.
All six lighting zones can be controlled from a hidden drop-down panel in the upper cabinets. All zones other than the night lights are tied into a single two-way switch, which can be operated from just inside the sliding door by the bed, or in the drop-down control panel between the galley and the bed. This way, you can leave the night lights on all of the time, but the other lighting zones can be turned on and off from two locations. The brightness of each zone is controlled by individual lighting control knobs in the drop-down panel. This way, you can set the brightness of individual zones to your desire, and then close the lighting panel. Then you can turn the set lighting configuration on and off from inside the sliding door, which is also reachable from the bed. If you need to change the brightness of Zones, or turn zones on and off, you can drop down the hidden lighting panel to do so.
Electrical system:
The electrical system in this van is very high-end, fully automated, and very efficient. They are Victron components with Discover Blue LiFePO batteries.
It consists of 200 amp hours of battery storage, a 330 watt roof-mounted solar panel, a smart alternator charger, and an inverter/charger that is powering a 20 amp circuit inside the van, and can provide shore power to charge the batteries, and operate anything that requires alternating current (like the stove).
Everything talks to everything else, so it is extremely efficient. Everything is fully customizable as well, so if you ever change the battery system, every single setting can be changed on all of the devices.
While you’re driving, you will charge the auxiliary batteries with both the alternator and the solar panel on the roof. However, when you are not driving, the auxiliary batteries and solar panel will trickle charge the starter battery. So you can pretty much say goodbye to a dead starter battery…
There is a shore-power hook up that is hidden underneath the vehicle; a discrete design. You can easily regulate from a controller inside the living area of the van how many amps the inverter/charger is drawing from this hook up. It is a 20-amp hook up, so even though the inverter can handle up to 50 amps of shore power, it is only wired for 20 amps. It is unnecessary for anything greater than this for this vehicle. You only really need the full 50 A if you have multiple 20 amp circuits, and perhaps a roof mounted air conditioner that runs off of alternating current.
You can control what the inverter/charger pulls from the power source, so that if you are hooked up to a 15 amp circuit from a house or campsite, you will not pop the breaker.
The inverter will also supplement any power needs with batteries if necessary, and then immediately recover the batteries once the power need is no longer present. So, for example, if you limit the inverter to only pulling 8 amps from an outlet, and you turn the stove on full which pulls 15 A, the batteries will supplement the additional 7 A while the stove is being used. Then, when the stove is turned off, the inverter will recharge the batteries to make up for what what was used to supplement the usage. This is all done automatically. You will not have to do anything.
Obviously if you are connected to a 20 amp dedicated circuit, such as at a campsite with electrical hook ups, you can regulate the current draw to, say, 17 A, which is more than enough to power the hot water heater, stove, electric kettles, etc., while still being able to charge the batteries simultaneously.
I installed a smart shunt to monitor all current going to or from the auxiliary battery system. The smart shunt also monitors the voltage of the starter battery. This smart shunt will broadcast the actual current and direction of current to other charging devices. In this case, the solar charger will receive the true current reading from the smart shunt, and supplement whatever is necessary. For example, if the batteries are charged, and nothing is being used, the solar panel will not be providing any wattage to the system to not overcharge the batteries. However, if, say, the fridge turns on, and pulls about 70 W, the solar panel will instantly and seamlessly provide 70 W to the system to maintain the float voltage for the battery system. Then once the fridge shuts off, it will automatically stop providing this power.
I set all of this up, so you should not need to do anything for this to work seamlessly.
There is a single 20 amp pure sine-wave alternating current circuit that is feeding the vans interior power needs. This powers the stove, the hot water heater, and two GFCI convenience outlets.
The hot water heater and stove are on a relay, so that when you turn the hot water heater on, it disconnects the stove from power, and inversely, reconnect the stove when the hot water heater is shut off. That way you will not over-stress the electrical system by using the stove and hot water heater at the same time. It also makes it so that you only will have the hot water heater on when you want it on.
Draw breakdown:
Low Voltage:
Base Draw: about 12 watts. This includes all system controllers, starter battery trickle charge, and USB chargers receiving power .
Fridge: 70-80 watts
Lights: about 40 watts on high (all zones full brightness); 17 watts for how I usually have it set.
Mini Split A/C: 500 ish watts on low, 850 ish watts on high (incredibly efficient and on 12v system so no inverter is required to operate).
Heater: 150 ish watts on startup (glow plug) for about 1-2 min, then about 10-25 watts for the fan while it’s on, depending on the blower speed.
*Heater fuel: While set at a very comfy 70 degrees, It has used about 1-2 gallons of diesel per week if it’s on 24-7, depending on the ambient temp and how often the sliding doors open, whether windows are cracked for air flow, etc.
High Voltage:
Inverter on, no load: 18 watts
Hot Water Heater: 1400-1500 watts (while on)
Induction Stove: ranges from about 150 watts on low to 1800 watts on high
Charging Capabilities:
Alternator: 280-350 watts (it throttles the wattage if it gets hot)
Solar Panel: 0-330 watts. Average is about 180-220 watts on a normal sunny day. 330+ in summer at noon.
Shore Power (inverter/charger): this inverter/charger can easily provide more wattage than the batteries can handle. To preserve battery life, accommodate for additional charging sources possibly being on simultaneously, and while still providing a fast-charge on shore-power only, I have it set to about 1000 watts max charging power. But you can easily adjust this if you ever install additional batteries for longer time off grid, and need more charge-current as a result.
If you’re on shore power with the engine running and the solar panel is on, the systems combined could charge the batteries at up to 1500-1700 watts, which is still within the battery‘s comfortable range.
*4 season ready*
Cold Conditions:
100% Internal water system with diesel heater on a smart thermostat. No frozen pipes. No need to drain system or fill with antifreeze. Camp in winter with peace and ease…
Diesel Heater: I installed a Ebersoacher Diesel heater. It is pretty quiet when it’s on low, and it has a amart thermostat with variable speeds, so once it gets the van to temp it will find the perfect btu level to maintain it. In other words, it’s not either on or off; it will find the perfect speed to stay on gently and keep the van at temp. This also makes the heater very quiet for the majority of the time; both inside and outside of the vehicle.
The heater is incredibly efficient. It sips diesel very gently and uses next to no electricity. It can run for days straight and barely make a dent in the diesel supply, or the battery. The only electricity that is used is to heat the glow plug upon startup, and to operate the fan and fuel pump while it’s running. At peak on startup it uses about 50 watts for about 2 min. Then it uses between 10-20 watts continuously for the fan, and can easily keep the van at a steady 70 degrees with freezing exterior temperatures. To offer perspective, if you have no solar, no shore power, and you’re not starting the engine, the heater could still run for days in the auxiliary battery if you’re not running anything else.
The heater is tapped into the auxiliary fuel line, so it will never run you out of fuel. The auxiliary fuel supply is designed to stop sipping fuel once the tank is down to a little less than 1/4 full. So if you are relying on the heater for extended periods of time, be sure to keep this in mind and keep the fuel tank well above 1/4 tank, or the heater will shut off and will have to be rebooted.
The batteries are on low wattage heating pads, on a thermostat, so they won’t get too cold to charge, unless the v vehicle is neglected for too long and the Aux batteries are permitted to drain over time. (Plugging into shore power helps in the winter since solar is less effective)
I’ve been in sub freezing conditions with no issues. Batteries stay charged, water system hasn’t frozen; including the outdoor shower line in the garage.
If you do wish to winterize the van - for example, if you are parking it and are not going to use it for a while in freezing conditions, I installed a method to create back pressure on the hot water heater and water system to almost completely drain it, so that you do not ever need to use antifreeze in the system. Who wants antifreeze in their water supply? Not me... I can show you how this is done. It uses an air compressor with a custom adapter that I made to do so. This, in combination with shutting off the auxiliary power system entirely, will fully winterize the vehicle. You should remove and put the starter battery on a battery-tender if you can if you’re storing it long term.
Hot Conditions:
Air Flow:
I opted for a roof fan instead of a roof mounted air conditioner. I instead installed an under-mount mini split AC, which was far more expensive ($4,000+), but it kept the roof available for a fan and solar panel. This also keeps the van more discrete without a giant visible air conditioner on the roof, and it makes the van less-tall overall, and creates less drag is created for optimal mpg.
I also installed two awning-style windows in either side of the bed. This makes it possible to crack open, or fully open the windows by the bed, open the roof vent, and turn the fan on to blow air out of the van. What this does is it creates a constant airflow right past you while you’re sleeping. Obviously this would not be used if the air conditioner is also on. But I really designed this can to be out in nature and to be immersed. The air conditioner is something that I barely use. I usually just open the van and smell the smells and hear the rivers. I do have magnetic screens for the side door, and the back doors. So you can fully open the van, and keep bugs out. The windows by the bed also have a screen and blackout function. So you can have them open, have the roof fan on, have a breeze past your face while you’re sleeping, and have the screen closed so that you do not get bugs in the van.
I installed a fan on a gimbal to move air throughout the van if necessary. You can aim it at the swivel seat, or the bed. Or anywhere in between. This makes it really nice at night, as you can have the breeze going past your face, but also the fan blowing to where you were sleeping. It makes even a hot night quite pleasant if you’re sleeping with just a sheet or something. And if it’s just too hot, and you are connected to shore power, you could run the air conditioner all night if you wanted to. I do not recommend running the air conditioner overnight if you are off-grid. It will drain the AUX battery. Especially if you also have the fridge on. But you could run the roof fan for days and have fresh air all night.
A/C:
I installed a mini split air conditioner that can offer up to 14,000 btu of cooling power. It is very efficient and runs off of the 12v, so the inverter does not need to be on in order to use it. On high it pulls about 800-900 watts. On low it pulls about 400-500 watts. The solar panel can supply up to 330 or so watts in direct sun, and the alternator can supply up to 350 watts if the engine is running, which offsets the use of the AC. If the engine is off and you are in the shade, the AC could run for several hours on a charge. On shore power, obviously you could run the AC indefinitely without the engine running, so at any campsite with electrical hook ups, or if you are parked in front of somebody’s house, you could have the air conditioner on indefinitely without the engine running.
The undermount AC is virtually invisible from outside the van as it is tucked up into the area where water tanks would otherwise be (again I made this to be a 4-season vehicle so there are no external-exposed water tanks or pipes). The AC is quiet when operating on low, and reasonably quiet on high, so it won’t disturb neighbors or draw attention much at all, unless someone is very close to the van.
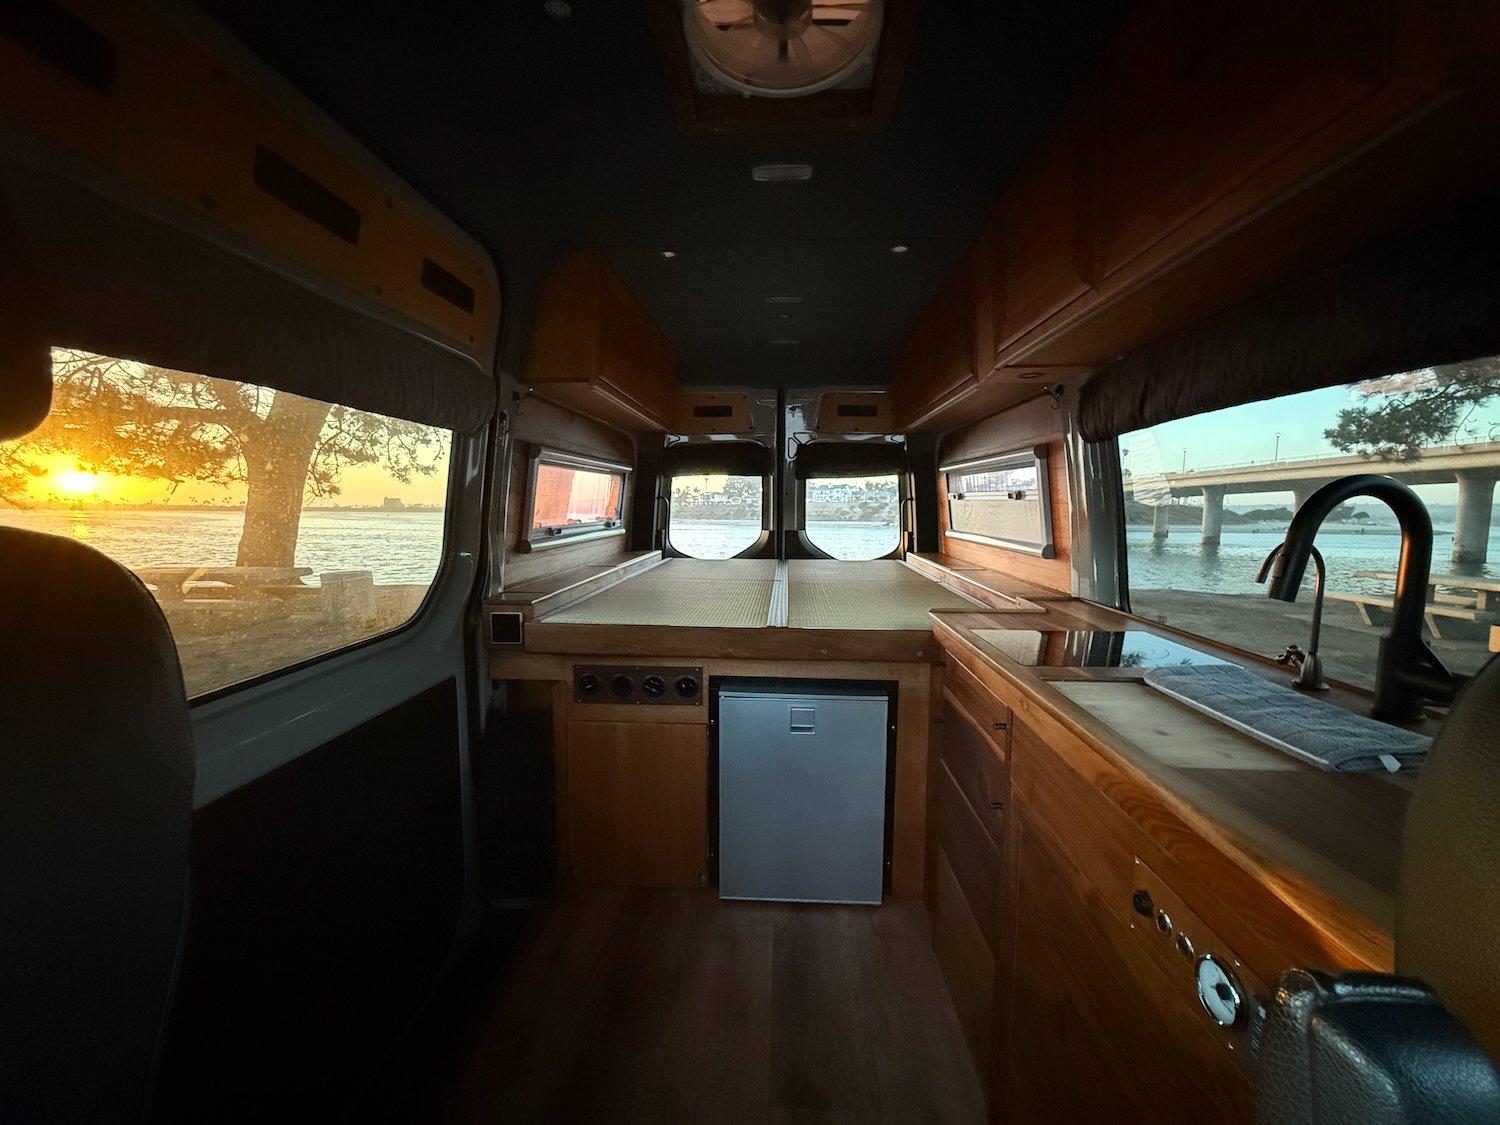
Galley:
The fridge is an isotherm, designed for sailboats. It is very efficient. It only draws about 70 W or so while it’s on. It is connected to the 12 V, so you do not need the inverter on to use it. There is a tiny freezer. It is just big enough for some ice cream bars or something. There is also a switch under the bed to turn the fridge on or off, so if you want to use it for dry storage instead of cold storage, all you need to do is turn off the fridge with an accessible button.
The stove is an electric induction, single burner stove top. It is incredibly efficient. I opted for induction for its efficiency. You can select either a number for the intensity of the heat, or you can have it maintain your pan or pot at a specific temperature. It boils water very quickly, and efficiently. You do need the inverter on for the stove to work.
There is a hot water heater. It is electric. It holds about 2 gallons of water. It is on a switch that you can turn on or off. What I often do is turn it on while I’m driving, and then when I get to my destination, I have hot water, and full batteries. There’s enough hot water to easily do dishes, or take a quick shower in the outdoor shower. If the flow is low enough, it will keep up with a very simple shower. The hot water heater pulls about 1400 W while it is on, so I did not recommend leaving it on unless you are on shore power.
The sink is a nice functional deep sink, with a faucet with a pulldown head, and low flow aerator. It is supplied with both hot and cold water. It drains into a 5 gallon water container. You will have to empty this frequently. I opted for internal water storage to use this in winter. The trade-off is that the gray water tank does need to be emptied fairly frequently if you are using the sink a lot. This water container is translucent, so you can easily check it periodically. I made it very easy to remove the tank, with a union joint. You simply unscrew the joint, pull the tank out, empty it, put it back, and screw the union joint back together to reconnect it to the drain of the sink. The whole process is extremely easy. I add about 1 tablespoon of bleach each time I start fresh so that the grey water doesn’t start to stink.
I installed a stainless steel water container that holds 15 gallons of water. I opted for stainless steel because I don’t like plastic for water storage. I installed it on a drawer, with straps to hold it in place. This makes it very easy to pull it out into the open space, and refill it. I personally use two 5-gallon carboys to fill it, or a hose run through the sliding door.
I installed a 1 gallon water accumulator tank which accumulates water pressure from the water pump. This makes it so that the pump only turns on to re-pressurize the system, and doesn’t run until the water pressure drops enough to trigger it to turn back on. This makes it so that you can have a very low flow of water, and the pump will not cycle rapidly (or be on at all if there’s enough water pressure). Essentially, you can use a little over a half gallon of water at a time without the pump cycling back on, as this is roughly the pressurized capacity of the accumulator tank. The tank is designed for RO water systems.
The plumbing is the only plastic in the system. I used pex, because it stands up to the vibration of driving. Lots of people who have used copper have had issues with breakage and leakage overtime. Pex is flexible, durable, and extremely easy to service, if necessary.
I also installed a two-filter system for drinking water. The water that comes out of it is very clean and has no remnants of chlorine. It also filters out all of the butyl from the water pump, which is unavoidable with water pumps. Every water pump will ultimately feed the water system with some rubber particulates. This way you won’t be drinking any of them. You will see them, when you change the filters, which I have done about every six months.
I do highly recommend treating all water that you store in the stainless steel container; even drinkable spring water. I recommend doing this to keep anything from potentially growing in the water system, which can include moss from natural spring sources. I personally use chlorine tablets for this purpose. The water filter I installed removes the chlorine.
The water pump is on a switch. So you can turn it off if you want to and utilize 100% of the accumulated water pressure without the pump turning on. When you turn the pump on, it also turns on the water level gauge. This makes it very easy to monitor the water level in the opaque stainless steel tank.
Toilet:
Again, to make this a 4-season vehicle, I opted for a cassette toilet, instead of a black water tank underneath the vehicle. It is also very easy to empty. All you need is access to a bathroom somewhere, and you can empty it into the toilet. You can also empty it into a dump station or clean out valve. I found just the right enzymes for it, which I can recommend to you. But you can use whatever you like.
The toilet is on a locking drawer, and hidden behind a wooden panel. If you need to use the toilet, you can remove the panel, and pull the toilet out on the drawer system. It will lock open, as well as lock closed. This means that a passenger can even use it while the vehicle is moving, if necessary. If you have a passenger who needs to pee, for example, they can do so without the toilet sliding in and out of its compartment.
I can send you the model of the toilet that fits in the space, if you would like a fresh one. This one has been used, so although it can be cleaned, I imagine that you would want a completely fresh one. They are not expensive. Under $200. Or you are welcome to use the one that is currently in the van. It’s very clean… But it is used.
I bought the van new for about $56k, invested roughly $60k in parts/materials, and spent several months designing and building it.
It has been well taken care of, well maintained, and is still under extended warranty (transferable).
Asking $140k OBO (You are welcome to offer me more as well if you think I'm asking too little 😁)
Video
Contact seller
Write a message to the seller of this vehicle
2021 Mercedes Sprinter 2WD
$140,000
San Diego, CA
Contact seller
Write a message to the seller of this vehicle
2021 Mercedes Sprinter 2WD
$140,000
San Diego, CA
*Financing offers use LightStream's longest term available, with the lowest APR for a $44,900 boat/RV/aircraft purchase. Your loan terms, including APR, may differ based on loan purpose, amount, term length, and your credit profile. Excellent credit is required to qualify for lowest rates. Rate is quoted with AutoPay discount. AutoPay discount is only available prior to loan funding. Rates without AutoPay are 0.50% points higher. Subject to credit approval. Conditions and limitations apply. Advertised rates and terms are subject to change without notice.
Payment example: Monthly payments for a $44,900 loan at 7.49% APR with a term of 3 years would result in 36 monthly payments of $1,396.
Similar Listings
2022 4X4 Mercedes Sprinter 144 – One-of-a-Kind!
San Diego, California
2021 Mercedes Sprinter 170WB – Master Overland Luxury Build – 600Ah
San Diego, California
Ultimate Sprinter Sleeps 4!
Denver, Colorado
2022 Mercedes Sprinter 2WD
Carbondale, Colorado
ADV Vans 013 ADV Mobil Show/Expo Van For Sale info
Howell, Michigan
4 Person 4×4 Campervan
Calgary, Alberta

2025 Mercedes Sprinter AWD NEW TOMMY LUXURY ADVENTURE VAN “THE MAV”
Phoenix, Arizona
2017 Mercedes Sprinter 4×4 (Nomad Vanz)
Houston, Texas